Cabinet Pulls in Brushed Steel and Brushed Bronze

We have in previous posts discussed how to create colorful patinas and oil rubbed finishes on bronze hardware, but we are often asked to create more understated finishes and are able to do so by brushing or sand-blasting or polishing the surface of the piece.

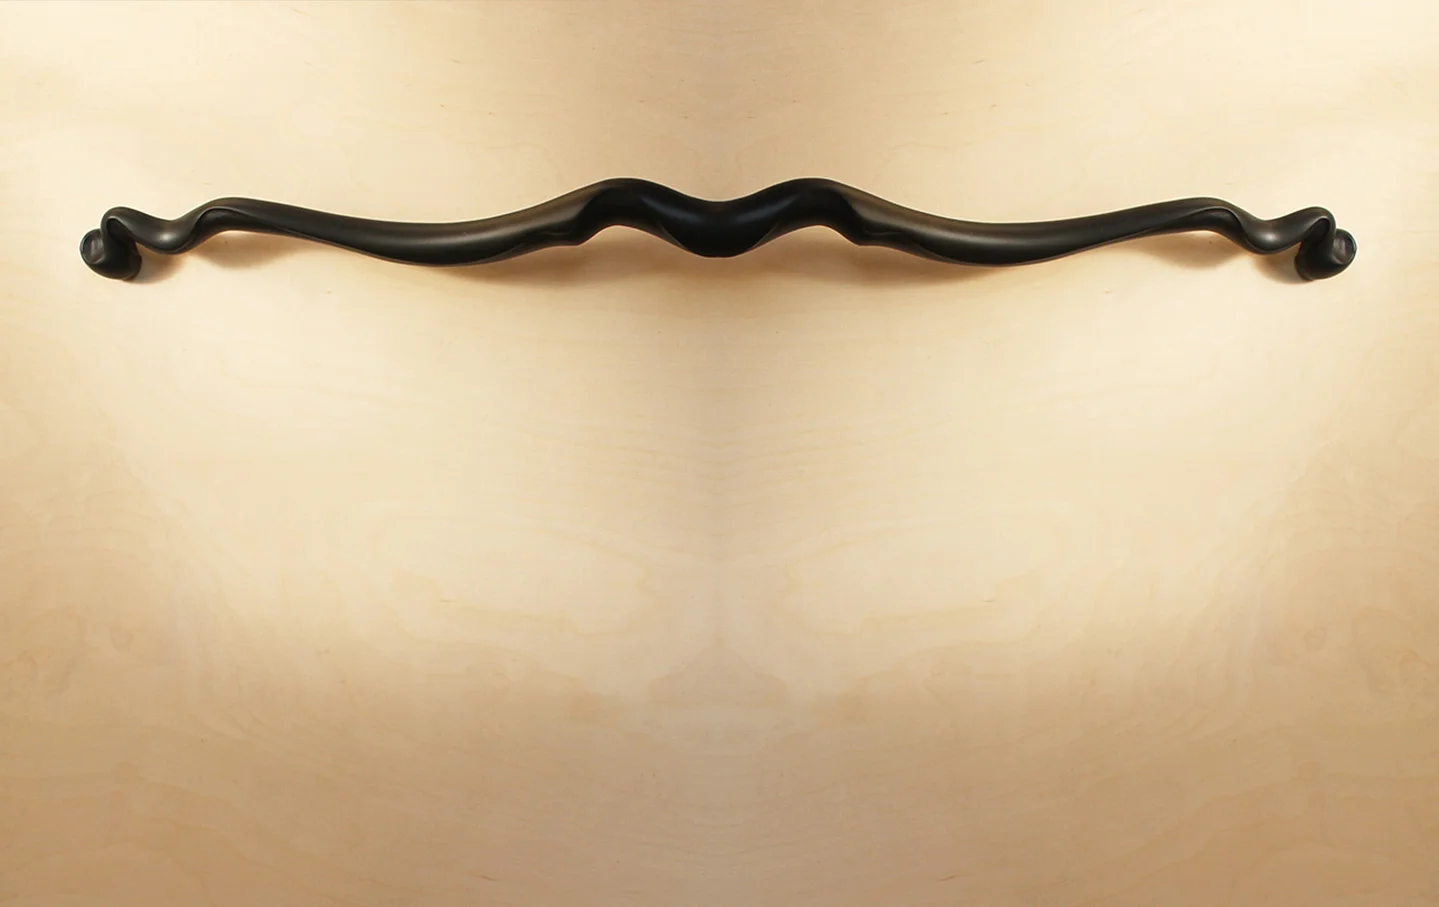
While the Ergo cabinet pull is contemporary in design it takes on a jewel like appearance when highly polished and becomes subtler when brushed or sand blasted to a low luster.  As with most of our cabinet hardware this cabinet pull can also be ordered in silicon bronze which is a warmer golden toned alloy. Natural bronze, like stainless steel can also be highly polished for a mirror finish or brushed for a subtler effect.

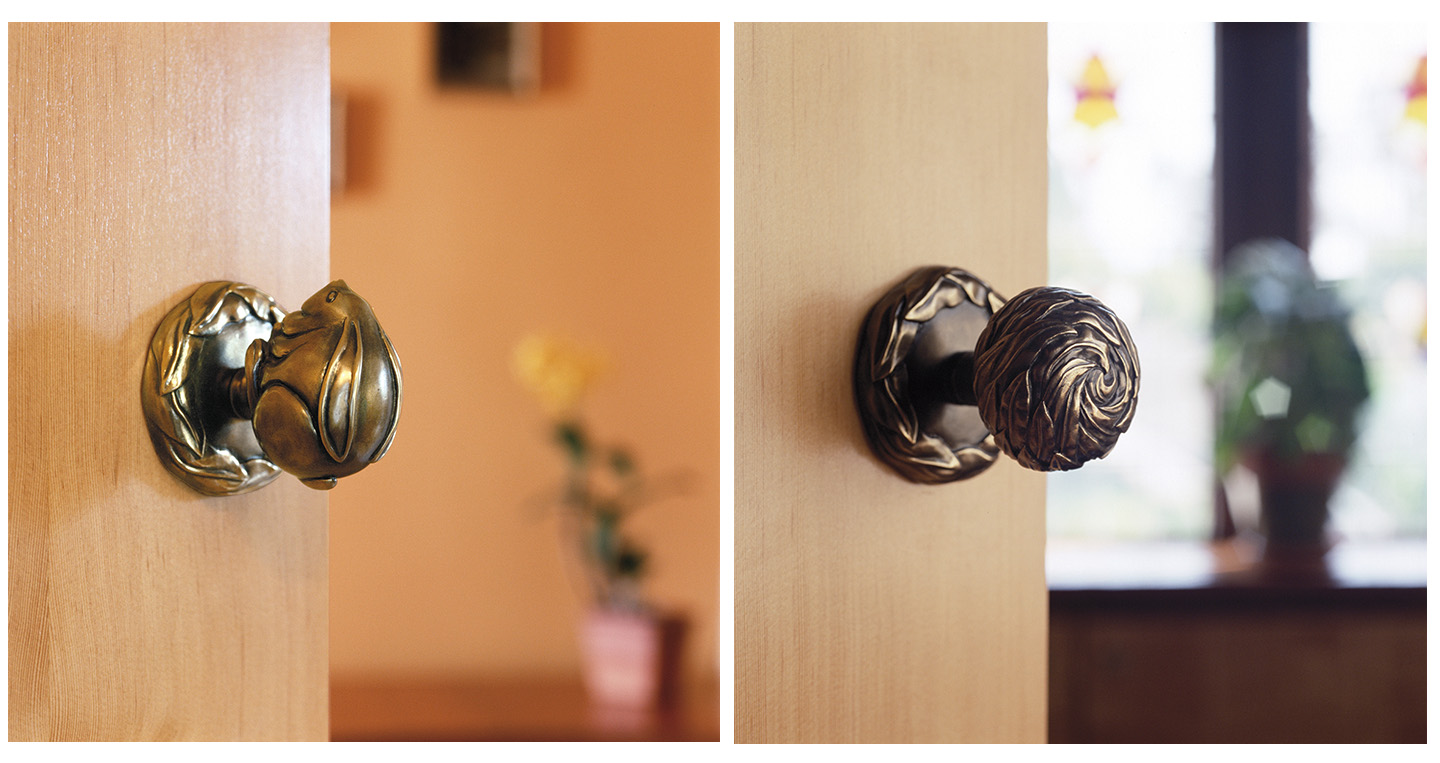
Once the right amount of luster has been achieved color and highlights can then be added either by creating textural tones with polished and non-polished areas or by applying colored patinas to all or part of the cabinet pull.

In the group photograph the Ergo pull is shown in 4 quite distinctive finishes. The top view shows this 7” wide piece cast in stainless steel and finished in a two-tone luster with the face highly polished and the balance in a softer fine sand blasted finish that accentuates the shape of the wave design. The bottom picture shows the pull cast in silicon bronze and finely brushed. The center pictures demonstrate how the bronze tone can be developed from a light antique to an almost iron black finish using cold patinas that are sealed in place using with oils applied with a soft fine cloth.

One Feather At A Time - The Raven Sculpture Journal

Continuing the journal of Martin Pierce’s Raven sculpture. 

Following his visit to Big Bear where he was able to see  raven’s up close Martin decided he needed to change the pose of his sculpture to show the raven cawing with his beak open and throat puffed to make the distinctive sound raven’s use when declaring their territory or courting.

Once captured in pencil, the raven’s 3  perspectives  were outlined onto rough wood blocks, one for each section of his body. In deciding  how to sectionalize the raven’s shape Martin had to reverse engineer the sculpture by determining how the bronze would eventually flow, where the  gates for the bronze could best be added and where thereby the bird could best be sectioned.

Constructing and de-constructing a Raven for lost wax casting

Constructing and de-constructing a Raven for lost wax casting

If Martin had been intending to make only one wood sculpture he would have chosen a wood with more character than basswood and would have sculpted the bird from one block of wood rather than several pieces. However, as this sculpture will be used to create several molds for lost wax casting the sculpture was made so that it could be de-constructed.

The raven will be cast in bronze and will be available as a limited edition. The raven will join his feathered friend the scrub jay in Martin’s collection of bronze sculptures, which as well as portraying birds also portrays insects in fictional settings.

Color Changing Door Handles

We have just changed our profile photo to a collage image of colored door handles taken from our Morphic and Coral styles of door hardware. Our illuminated handles began with the introduction of low voltage LED lights into our Morphic cylindrical handles. To do so we had to solve the problem of how to incorporate a hard wired LED spot into a cylindrical handle the smallest of which has a mere 1.25” internal diameter.  As the cylindrical handle is vertical and as the design is open we could not use a strip of LED lights but needed to work within the confines of a small downward projecting light with a narrow 10 lens that would center rather than diffuse the colored beam.

The cylindrical handles range from 16” to 32” in length and are available either with a single color constant voltage LED spot with built-in driver or a color changing constant current spot.

The profile collage also shows the illuminated Coral handle which is one of 3 panel style door handles These are also color changing handles but are lit using multiple diodes encapsulated in a weather proof flexible strip that fits into the inner perimeter of the handle.

Both types of door pull are made using the lost wax method of  casting and  are available in bronze or stainless steel and are UL listed.

What determines the direction of a door handle

For many the question of a door handles direction is seen as a question of door handing and not a question that has much to do with design and possibly whimsy.  While it is true that the handing of a door lever is determined by the location of the doors hinges this need not always apply to door pulls or door grips. The answer is further complicated when the designer, in our case, Martin Pierce has a keen sense of what is correct from a natural perspective. This recently came up in a conversation with James Cunningham a photographer who we recently worked with to enhance the background of our Morphic Scroll door pull. The scroll pull is clearly a vertical pull but the curved grip can just as easily face outwards or inwards. Martin designed the piece for the Baha Mar project in collaboration with Mike Hong the projects architect. The   concept drawings have always shown the piece with the curve pointing outwards but this is not how James Cunningham saw it.


There are some door pulls where it is up to the artistry of the designer or consumer to determine the best direction for a piece.


Then there are the practical aspects to consider - when a door stile is narrow while the width of the grip may fit the space it may be wiser to have the grip face away from the door jamb as this will reduce the risk of grazed knuckles that would occur if the grip direction were reversed.


Tree Door Handles - when to through bolt

The Hedgerow tree handles are made either as large scaled heavily canopied door grips or as smaller door pulls. When they were designed we had planned the larger 19” handle to function as an entry door handle and its smaller cousin as a 9” cabinet door pull.

The different functions impact how the tree is mounted as cabinet pulls are typically mounted through the back of a cabinet with a wood screw that is screwed into the back of the threaded and taped tree. Occasionally the smaller trees are surface mounted as was the case recently when they were mounted on a wall and used as decorative fixtures for curtain ties

The small tree is increasingly been used as door pull for smaller interior  doors where its scale is more appropriate or on wood framed glass doors where a lighter handle is preferred. When used as an interior door both sides of the door are seen and so 2 trees (a left and a right) are used. The 2 trees are connected with a custom bolt one end of which is welded to the tree while the other passes through the door into the back of the second tree where it is held in place by 2 discreet Allen screws (set screws)

Through mounting works equally well for larger entry door grips though for added security the welded bolt should be attached to the exterior handle thus preventing its removal by someone equipped with the necessary Allen wrench.

Yacht Door Handles in Polished Steel

The fluid design of the  Morphic door handle is increasingly being specified for yachts and oceanic projects in a  highly polished finish. The mirror like finish compliments these watery locations and as it is cast in stainless steel it has excellent rust resistant properties. The physical durability of stainless steel also makes it ideal for high traffic public areas which are the norm in the hospitality industry. We have recently completed 12 sets of our Serpentine handle for a new yacht designed by SMC a  London based group that leads the field in maritime design.

Working closely with the projects specifiers, DEKO Ocean of  Denmark, we made necessary modifications to ensure that the handles would work for the projects 3” deep aluminum fire doors.

Coincidentally the Morphic style chosen for SMC’s project is one that owes its inspiration to marine life forms and in particular to the lace like appearance of  coral and to the tentacles of squid and octopi. Despite its oceanic origins  we named this piece “Serpentine” to more immediately convey its shape and to set it apart from other pieces in the series.

The Serpentine handle measures 31”H by 4”W ( 812mm x 100mm) and is suitable for most wood, glass and stone doors. The handle is mounted over a small concealed mounting bracket that is attached to the door. Once the bracket is firmly in place the Serpentine handle then clips over the bracket where it is held in place by Allen screws on either side of the handles tips.

Traditional artistic methods and 3D printing

One of the advantages to old school artistic methods is that they allow the artist to make more immediate design corrections. While CAD does allow the artist to see his virtual sculpture from a 3D vantage, the same holds true for perspective drawings done free hand with pencil and vellum. No doubt the ease and speed of both methods owes a lot to the different ways our brains are wired and to the different way we learn our artistic skills. While Martin Pierce does use a Wacom tablet with built in mouse, for his initial development drawings he finds he can achieve a faster result by adding and erasing pencil lines.

Plan View of Raven Design

Plan View of Raven Design

This is the same approach he uses when creating custom door handles and as with sculpture, the grid drawings can be placed on solid wood so that the shape can be traced onto the wood’s surface and then cut out with a band saw. While we could use 3D printing to create the pattern, the speed of printing a quick cast SLA model and the cost makes this approach less attractive. By comparison, once a pattern has been sculpted and the artistic and practical bugs sorted out then 3D printing comes into its own if one wants for example to create a left or right version of a piece. We have occasionally used 3D scanning to scan a pattern and then have created a print file that is a mirror image thus allowing a 3D print to be made. The only drawback to doing this is that you end up with a clone of the original and Martin tends to have a preference for asymmetric designs.

Profile of Raven design

Profile of Raven design


Ergo Epic Pull In a Black Powder Coated Finish

So what do powder coating, grab bars and epic door handles have in common?

Answer: A creative designer meeting the special needs of an artistic client.

We derive immense satisfaction from working with creative designers and over the years have collaborated with many to  customize our designs so they will meet a client’s specific needs.

Diane Morrison is a designer who we first worked with when we adapted  our Grapevine door handle for use  as a hand rail on a corridor wall. Diane is based in Downingtown Pennsylvania and often works with contractor Merv Landis on her local  installations. Recently Diane approached us to see which of our Ergo designs could be adapted for use as a grab bar in a powder room project.  The room had existing pewter and iron trim and while the client wanted to continue with these metal tones we needed to   use a more sturdy metal and one that would hold up to  moisture.  Stainless steel as a rust resistant alloy was an obvious choice but  many of the patinas one can apply to it are not sufficiently durable.  Diane sent us a color chip and with Dan Regan’s help at Primo Powder Coat we were able to find the right powder to bake onto our stainless steel handrail to create a highly durable finish.

The Ergo epic pull was the perfect choice of design from this series being a sturdy 35” handle but we were dealing with an existing space where the supporting studs were spaced at 16” intervals and the Ergo mounting posts were set at 34”. Merv  Landis solved the problem by creating a  sturdy brace inside the interior wall that spanned 2 sets of studs and provided a solid structure for our lags bolts to screw to.


To reach Diane Morrison please contact her: dianedmd@gmail.com

Ravens at Big Bear Alpine Zoo

The Raven sculpture is now taking shape as Martin develops a clearer understanding of this magnificent bird’s wing movement, body stance and general proportion. Having tentatively decided to sculpt a male in pre-flight position,  a visit to the Big Bear Zoo is making him question if this is the pose he wishes to capture as a sculpture.

Finding a live accessible raven has been a challenge as our local Los Angeles zoo could not help. However, the zoo at Big Bear next to Snow Summit has 2 pairs of ravens and we were allowed to freely photograph them. Day one proved frustrating as neither pair was in the mood to be photographed but on day two we were able to take some beautiful shots of their head profiles, plumage and talons.

Raven Profile

Raven Profile

The zoo is well worth visiting and is just over 2 hours by car from Los Angeles and offers a wonderful range of animals including timber wolves, raccoons, coyotes and 2 snow leopards. As they state on their site ” The Big Bear Alpine Zoo is a rehabilitation facility offering injured, orphaned and imprinted wild animals a safe haven, temporarily while they heal, or permanently, as they are unable to survive on their own. We are extremely proud that 90% of all the animals brought to us for rehabilitation are successfully released back into their native environment.”

Plumage and back talon detail

Plumage and back talon detail

Equipped with a better understanding of these 4 ravens Martin will turn his focus back to his drawing board to decide what changes he will make to his initial concept drawings.By year end we hope to have a new bird sculpture to add to our collection of bronze sculptures.

New Raven Sculpture Takes Shape

Following on in the quest for a perfect raven sculpture Martin has drawn his intended subject side on and full scale at 22” from tip of tail to tip of beak.  Using old school techniques to maintain the bird’s proportions he drew the raven on a 1” size grid and then increased the grid to 2” to achieve the correct size. While this could have been done in photo-shop with a grid tool, the size of the piece would have made it cumbersome.

He will now need to draw the front elevation, plan and top view so that he can correctly show the leg stance and wing position and capture the birds pre-flight position with the wings slightly apart.

Finding a captive raven to study for the other elevations has not been easy but we have found 4 ravens who are residents at the Big Bear zoo so will be travelling there soon to get some footage for the next stage.

Martin will be carving the raven in basswood which is a tight grain but relatively soft easy to carve hard wood. At this point he plans to carve the bird as whole sculpture to ensure its correctness from all elevations. Once it looks correct and mindful of the cost of and weight of bronze he will then cut the sculpture down the middle so that he can carve out the center and thus make the sculpture hollow.

raven drawing 3.jpg

Blue Birds Make A Clean Start in 2018

We celebrated 2018 in Paso Robles with close friends and our dog Iris. The hikes, chilly air and the bird life all helped to revitalize our moods and energy and so like these Blue birds we enter 2018 with a refreshed perspective.

We have incorporated bird designs in both our animal cabinet pulls and in our jay bronze sculpture and will be adding a raven to our collections in the months ahead. While the blue birds shown here are vivid colorful creatures they do not make easy subjects for bronze castings as their markings and multiple colors are difficult to create even with hot patinas. The scale of these small birds with their thin legs is also challenging making it necessary to add an artistic mount to support the heavy body weight. 

Blue Birds First Dip of 2018.jpg

Ravens  by comparison have a more uniform color range and stronger legs proportionate to their body size making them perfect as free standing sculptures. We live in the Hollywood Hills and have several families of ravens that we see on a daily basis and appreciate their flying skills, antics and obvious intelligence.

 Martin has just begun his initial design for this new piece and  has decided that the piece will be close to life size at 22” from beak to tail feathers and in a pre-flight position. He is currently hoping to find someone in the Los Angeles area who has a captive raven so that he can photograph the bird from other perspectives so if anyone has any suggestions please let me know.

Christmas Gift Ideas and the Need to Plan Ahead

At this time of year we often receive calls from parents trying to find the perfect gift for their child’s bedroom and so we wanted to share with you some of the choices people have made.

We are currently making a rabbit passageway set for a Santa delivery in New Hampshire. Thankfully Santa enlisted some advice from a local door and lock installer who helped with tricky issues like dealing with a very old and thin door. The installer understood that a narrow 1 1/4” thick door may be a problem for the latch mechanism as the tongue of the latch in this case was 1” but being a skilled professional he felt that with Santa’s good cheer he would be able make a hole in the door with a 1/8” to spare on either side of the latch. Phew, Santa was wise to plan ahead!

Of course there is nothing wrong in a little self-gifting but the adage always plan ahead is equally true. In this instance, as Santa was not involved, the home owner asked for our help in deciding what to order to replace her old very dilapidated kitchen and dining room door knobs. The doors did not have latches but were held shut by a roller catch or closet door ball catch at the top of the door.  The customer did not want to change the catch so we steered her towards dummy knobs that could be attached on each side of the door by screwing through the knob plate into the door, a low tech but good way of adding beautiful knobs to her kitchen and dining room doors.


Why do Door Knobs and Door Levers use similar but different latches

Deciding whether to use a decorative knob or decorative door lever is partly an aesthetic choice and partly a practical and ergonomic decision. The aesthetic part is self-explanatory and we offer all of our door handles as either round contained knobs or more expansive flowing levers.

The other deciding factor is the user’s ability to easily grip and turn a knob. A lever is by its design easier to use for those with physical challenges and this brings us to discussing the latch mechanism.

Difference between the latch mechanism for passageway  knobs and levers

The tubular latch used to operate a passageway lever has a stronger spring that serves to return the lever to a horizontal position. The latch can also only operate the passageway lever one way, so one depresses it to release the tongue of the latch but you cannot lift the lever to retract the latch. The lever can be depressed with minimal dexterity and precision making it a better candidate for ADA compliance.

By comparison, a knob latch can be turned in 2 directions clockwise and anti-clockwise to retract the latch tongue but gripping and turning the knob does place some torque on ones wrist as well as requiring dexterous fingers for gripping. The spring used to return the knob to its resting point is weaker as knobs are typically lighter in weight than their counterpart levers.


Unusual Refrigerator Door Handles - what to consider

High end refrigerator manufactures like Sub-zero allow consumers to customize the look of their refrigerator by selecting handles that will complement the style of their cabinet handles but deciding what handles will work both aesthetically and practically can be a challenge.

As a door hardware designer and manufacturer we thought we should review some of our handles to see which do and don’t work well for this use.

Before reviewing the styles there are some practical points to consider;

1.       You will need to order your refrigerator without the manufacturer’s standard issue handles and without the door being pre-drilled for the standard handle and also without the standard mounting brackets. The manufacturer will have their own door handle size and this is unlikely to be the same as the custom alternative.

2.       The alternative custom handle can then be installed either directly onto the refrigerator door or on to a custom panel that is being fabricated by your kitchen cabinet maker.

3.       Door pulls or grips rather than knobs work best as they allow you to more easily open the refrigerator if your hands are wet or full. A round or flat 90 degree angle is sadly the typical style for most refrigerator pulls and while these are easy to grip they are typically non-descript so use this as your practical starting point.

4.       While there is no standard length that is recommended for a refrigerator the grip will need to be attached at 2 points to the door panel and will need to be sturdy enough in size and width to easily open the door without difficulty and without coming lose after repeated use.

5.       You will need a professional cabinet maker or contractor to install the alternative handle in accordance with any manufacturer warranty guidelines.

Styles that work:

We see the kitchen area as a work space with surfaces that will need to be easily cleaned. My preference is to use more fluid slick styles without a lot of undercuts or filigree that will be difficult to clean. The Ergo and Morphic styles with the exception of the Morphic cylinder are good choices and look wonderful in stainless steel which will complement most refrigerator doors.

If you are using a wooden custom door then consider the Morphic and Ergo styles in bronze but with a baked enamel clear protective coating to help.

TIGER DOOR HANDLE VIDEO

The Tiger Door Handle can now be seen in all of his different LED colors in a recent video created by Jeff Jenkins of OneFoxTwoFox. The video can be viewed on our website or on our YouTube  channel where we also show videos for our door handle styles as well our other lighting products.

When time permits we work with Jeff Jenkins to shoot as much of our product as possible as the video medium allows us to really show the scale, texture and different perspectives of our work that cannot easily be captured in static photography.

We are currently and incrementally shooting a video which will feature our new long door grips as they move from the design stage to becoming epic 5’ tall door handles. The first piece in this series will be the Ergo extended pull which began life as a 12” cabinet handle that evolved into a 35” door grip and that has now grown to a 55” grip. The long grip video will also feature some current pieces that have been commissioned as custom pulls for a hospitality project in Houston.

Our work on the new Hedgerow door handle is the subject of a second video which documents Martin Pierce’s  skill as a wood carver and shows the development of this new handle from being a series of carved wooden patterns to becoming a series of wax replicas to finally taking form as a bronze door handle.

Tiger Illuminated Door Handle

Tiger Design for Illuminated Door Handle latest piece from Martin Pierce

The new Tiger Illuminated Door Handle has now been released into the wild or at least that is how we sometimes feel about the internet.  We have in previous posts explained how the pattern was created with old world skills using a scroll saw and aluminum sheet to create a durable pattern for lost wax casting. We have now completed  our first stainless steel castings and using energy efficient LED strip lights have created a color changing and single color illuminated Tiger door handle.


As is the case with all of  illuminated door pulls, the Tiger panel is  directly wired  with 22 gauge fine wires that are fed through the door frame into the decorative door panel.  The power is typically delivered to the door through an electric hinge and then conveyed to the handle through a low gauge harness that comes with the fixture and is ready for connection to a class 2 power supply.  

The Tiger door pull is UL listed and is lit with a flexible weatherproof strip  and encased in stainless steel which is corrosion resistant and durable.

Tiger is the fourth  piece in our collection of  illuminated door handles which include  Fish, Coral, and Morphic themes.

Work is continuing on the Hedgerow new tree handles  but as with any new design of this size and complexity there have been quite a few challenges to resolve and as we are now incorporating LED lights and have a left and right facing handle we have had a lot to think through.

Other illuminated designs are taking shape in Martin’s sketch book so stay in touch to see these as they evolve.

HAPPY HALLOWEEN

While we do not presently offer zombie door handles or other flesh eating creatures we do have a few lizards to celebrate Halloween with and there is a definitely an audience out there that demonize these reptile.

If you are  searching for air born winged demons then look no further as we have a left and right facing bat to add a note of horror or whimsy to your cabinetry.

Bats are left and right facing making them more ergonomic for the left handed amongst us. Their directional nature is also useful for the majority of kitchens where you have double doors or where you are looking to match the “handing” of your door. The challenges of door handing have been discussed in previous posts.

For those who associate toads with Halloween we can help you with our leaping tree frogs as cabinet pulls or with frog knobs for your interior or exterior doors.

In short we have a variety of Halloween offerings to choose from and hope the artistry of our designs as well as the medium of bronze will help your choice outlive the shortness of this macabre holiday. Enjoy.  


Moths a Brief Departure From Cabinet Knobs

Occasionally we escape from the demands of making cabinet pulls and make pieces for the sheer fun of it and this was the case recently when Martin decided to make 2 bangles to celebrate this writer’s birthday. Since bronze is a heavy alloy and since the lost wax casting process is lengthy,  Martin turned to 1/16" sheet copper to create these 2 pieces.

Lunar moths were the subject of choice, as their significant wing size and shape were well suited to artistic manipulation. 

For readers familiar with our previous posts on pattern making the techniques and tools used will come as no surprise.

Moth Bangle.jpg

The shape of the lunar moth was drawn free hand onto the copper sheet and the moth was cut out using a scroll saw. The rough edged piece was then filed using a fine tapered steel file. The outline of the moth was then traced onto the surface of a thick block of walnut and the wing veins added. The veins were then carved into the walnut block using a variety of gouge chisels to create depressed channels.

The copper moth was annealed with a blow torch that turned it purple and rendered it softer to work. Using 3/8" steel hex bolts Martin made 3 hand punches to work the copper. Having marked the wing veins on the copper moth he then placed it over the walnut block and aligned the wood and copper veins and beat the metal into the channels. 

Moths are featured in our animal and insect cabinet pull collection

The bangle was buffed on a buffing wheel to remove the coloring created by annealing and to remove tool marks. The dark accents were added using M20 by Birchwood Technologies that has been covered in earlier pieces.