lost wax casting

Lost Wax Casting – When to Make a New Mold

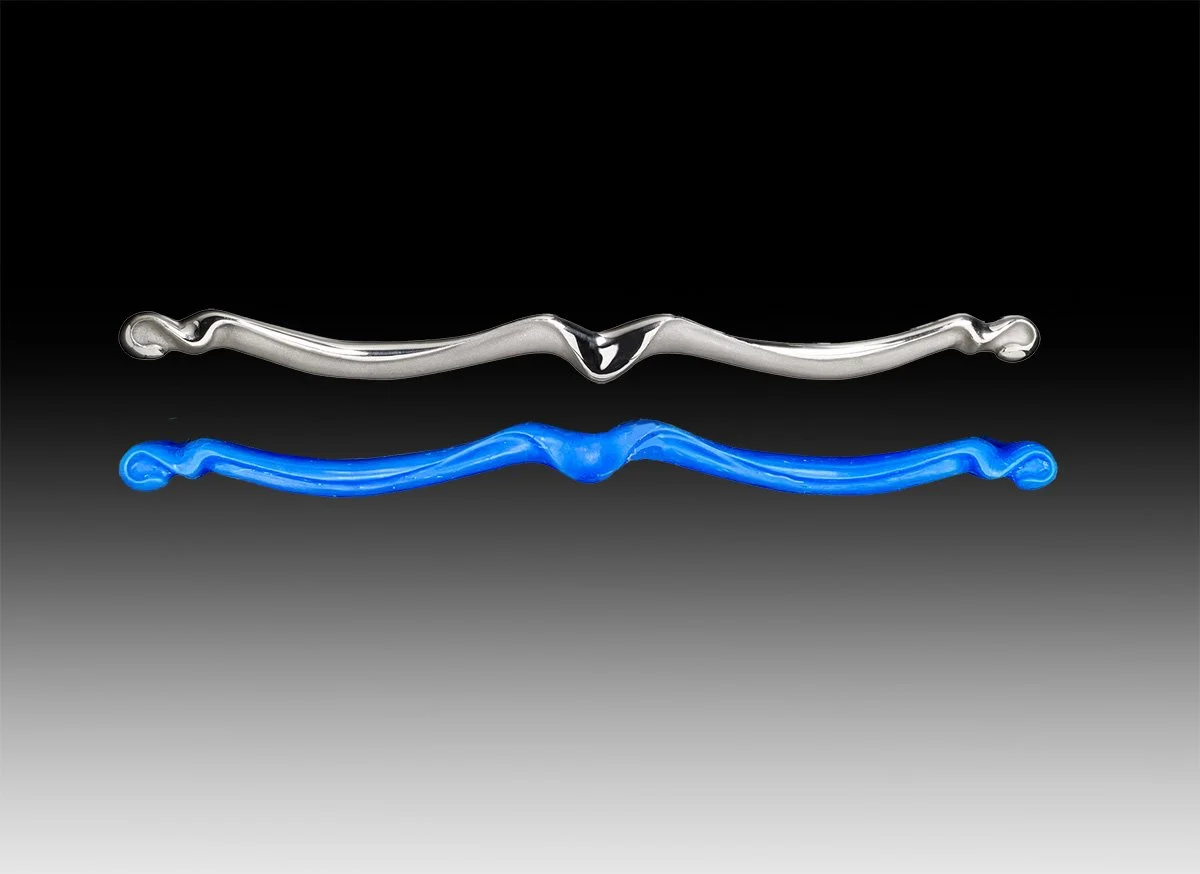
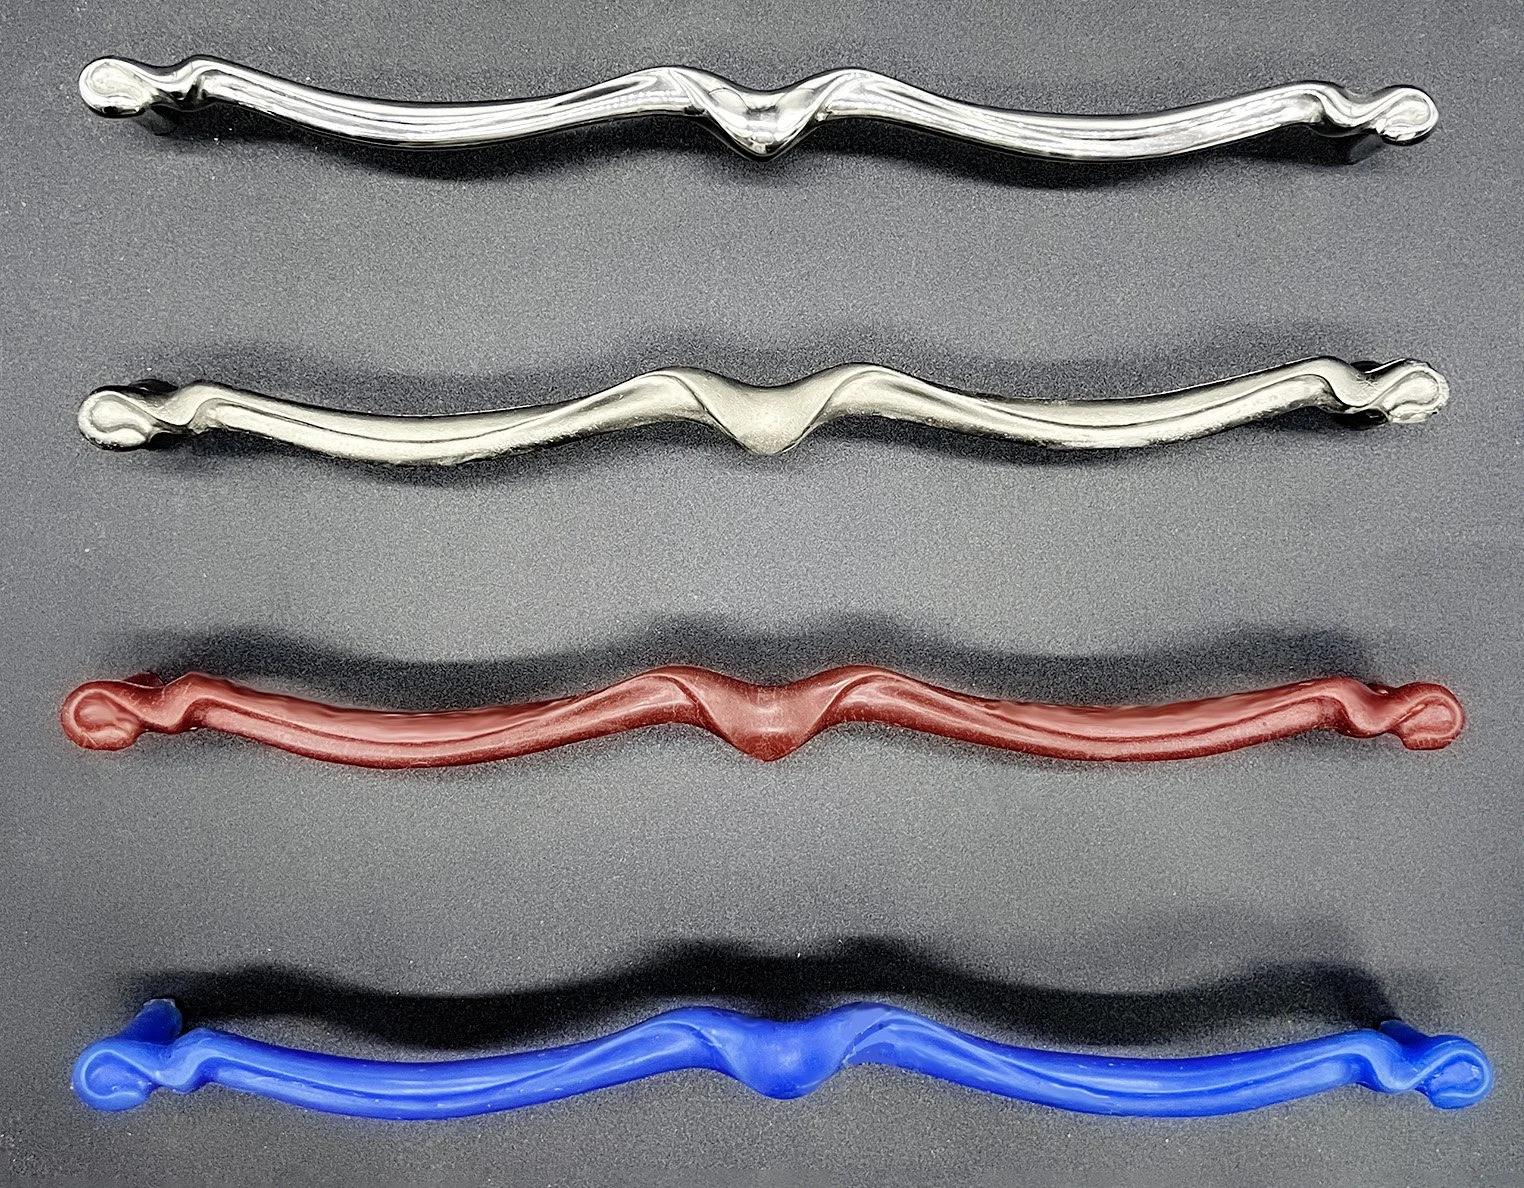
Creating wax replicas of an original pattern is central to the lost wax casting process, a method often used in handcrafted stainless-steel hardware, artistic cabinet hardware, and custom hardware designs. In this post, I am showcasing the 12-inch Ergo stainless-steel cabinet pull, a sculptural piece from our Ergo Collection, to illustrate the steps from wax to finished product.


- The process begins with the original pattern, carved in hard, dense blue jeweler’s wax. This step requires precision, as it sets the standard for the final piece. The handcrafted, modern sculptural cabinet pulls in both our Ergo and Morphic collections begin here.

 - Next, we create a wax replica by using a silicone mold taken from the original wax pattern. This allows us to produce multiple replicas while preserving the fine details.

- The initial casting in stainless steel reveals the form but not the finish as surface imperfections in the hardware need to be corrected.

- Final piece finely sanded, spot welded if needed, sandblasted, sanded again, masked, and finished to two lusters—one satin, one highly polished.

Many hands-on artists like us use a two-part silicone rubber to create the mold. A rigid box holds the pattern in place, and then the pattern is covered in liquid silicone and left to cure. To prevent air voids that can occur inside the silicone when it is being poured, we place the mold inside a vacuum pot. The vacuum then pulls air out and draws any pockets of air caught in the rubber to the surface, thereby eliminating voids.

Silicone molds made from superior rubber, when stored properly at moderate temperatures with no ultraviolet exposure, can last decades. So, why make another mold?

- Scale of order. We are a small, limited-production company with a wide array of custom door handles and sculptural cabinet pulls and with over 300 molds ranging in size from 2” to 35”. Each mold typically yields one wax, and given the constraints of space, we only make a second mold when the size of the order or the popularity of the piece makes it worthwhile. Depending on the size of the piece, the wax can take from 45 minutes to two hours to become firm enough to be carefully removed from the mold. If production warrants, we will make a second or even third mold of the pattern to increase the speed of production.
- Customization. As artisans, we are often able to accommodate requests to shorten and sometimes lengthen a piece, provided it works within the aesthetic of the design. If the order is for one or a few pieces, then we pour each wax and modify each one by hand. If the number of pieces is significant, it makes sense to produce a second mold so we can speed up production.
- High-value item or budget. If a client’s budget permits, then for large door handles we will make a new mold to create a customized piece. This is especially the case when the piece is being slimmed down where its depth projects too far. If this were for one unit, we could make the adjustment by hand to the wax, but if four or six pieces are needed—especially when some are used as back-to-back pairs—it is important that all the pieces are exactly the same. That goal is very difficult to attain if the pieces are modified individually in wax; hence, a new mold.

We will be documenting the latter two cases in the weeks to come as we start work on a large, very custom order.

Making of Katydid

The latest insect in Martin Pierce’s collection of bronze insects and humanoid sculptures is complete. From design to mold and now to bronze, the Katydid, a central figure in Martin’s fictional world is being released as a limited edition of 30 pieces.

The story of this fictional world has evolved, and we now discover that this realm was named Katydom after the Katydids who were the original cultural custodians of this new society.

We discover that Katydids began the insect race, a competition that is central to the inhabitants of Katydom and that is held each year. Together they drafted the rules of the insect race, central to which is the rule prohibiting flying. With their long legs and great stride, you might incorrectly believe that the race favors the Katydid competitor but while their limbs have length, they lack strength and are slow moving competitors.

 The Katydid is more than an agile long-legged creature and has over time become the trusted custodian of all insect folk lore whether this be told pictorially or by writing. Much of the folklore is recorded as writing and symbols on the wings of many Katydid elders.

As the story develops so does the inspiration for new pieces for the collection. Currently Martin’s is designing a large Katydid wing with small illustrations of the landscape and inhabitants of Katydom.

 Video Announcement

“The Making of Katydid” is also the title of Maria Ramirez-Adam’s recent video that can be streamed online. With acumen Maria, in this short but detailed work has captured the progression of this piece from design to mold to sculpture. Her editorial skills allow us to clearly understand how and why Katydid’s wings are welded to the body and how the body of the insect is hollow cast. The film ends with clips of the hot patina process, and we see how the brown translucent pigment is applied and how the sculpture is then finished with hot wax which is burnished when cool.

While the content of the film is engaging its ability to captivate the viewer owes more to Maria’s skill as a perceptive film maker and to the fabulous audio quality captured by Craig Parker Adams, Winslow Ct. Studio

Stay Tuned for the Sequel

A short feature video is currently in post production and when released we will learn how Katydom was created and the roles played by it’s characters.

Maria Ramirez-Adams is a Los Angeles based videographer and artist and her work covers many hip aspects of local culture from reels showing the flare of local Pachucos and Pachuca to fascinating clips of jets arriving and leaving LAX.


Happy Halloween with tigers, bugs and bats

Whether for Halloween, or for no other reason that simple fun, enjoy our creations any time of the year. We have a collection of animal and insect cabinet pulls to chose from all cast in bronze and made to order here in Los Angeles.


For those looking for animal inspired door handles we have a collection of lizard, dragon, frog and rabbit door knobs to chose from. Each piece is first rendered in wax before being dipped in silica to create a tough exterior ceramic shell and finally cast in molten bronze. The process is not complete until each piece is “chased” or finely tooled by hand to remove any imperfections. Still not complete, the piece must be burnished so that it can be finished with either a simple oil rubbed patina or a more colorful hot patina. Voila! A unique piece is ready for your home or office door or cabinet.


The tiger door handle is now available as a powder coated piece in a wide variety of colors. If you have a brand color this can be matched by creating a custom powder. As mentioned in a previous piece, we are moving away from illuminated handles and offering all these pieces in  powder coated colors. The dramatic effect is not diminished but this provides a low- tech solution to supply chain problems with small LED lights.

Custom door hardware - an index of posts on the process

Over the years of writing my blog I have often described the process from designing to casting door hardware using the lost wax method but have not until now felt it necessary to index  these posts.

The posts are broken down into 5 areas that describe the process from inception to end product. If you have limited reading time there is one piece that covers most of the stages that was was posted on June 21st 2017.

For details on the different stages please read on.

STAGE 1 - Design

These posts follow the creative process from the initial sketch to more detailed drawings that show the piece from different perspectives. They explain how the technical aspects of lost wax casting as well as the functional requirements of door hardware impact the design and result in modifications to the original concept.

https://www.martinpierce.com/blog/dragon-and-netsuke-door-knobs

https://www.martinpierce.com/blog/custom-designed-door-hardware-some-common-misunderstandings

https://www.martinpierce.com/blog/early-designs-for-a-new-entry-door-pull

https://www.martinpierce.com/blog/candlesticks-new-designs

https://www.martinpierce.com/blog/new-morphic-door-pull-one-size-does-not-fit-all

Stage 1 - detailed drawing from 2 perspectives Stage 2 - rough carving of pattern later refined

STAGE 2 – Pattern making

Lost wax casting requires an  original pattern or sculpture to be created. We create our patterns by sculpting  in a hard wood, blue wax or high-density foam. Our method is reductive and rarely makes use of 3D printing and we explain why in these posts.

https://www.martinpierce.com/blog/bumble-bee-cabinet-knob

https://www.martinpierce.com/blog/dog-door-knobs

https://www.martinpierce.com/blog/new-carp-fish-door-pull

https://www.martinpierce.com/blog/why-research-and-development-costs-for-custom-hardware-is-expensive-part-2

https://www.martinpierce.com/blog/3d-printing-as-useful-tool-in-casting-custom-door-handles

STAGE 3 - Mold making, gates and sprues

A mold of the pattern is made. The number of molds needed for one design depends on the complexity of the design and in assessing how the molten bronze will flow. The pattern is fitted with one central sprue and several gates that attach to the sprue and the edge of the pattern. A mold (s) is then  made of the pattern with the sprue and gates attached.

https://www.martinpierce.com/blog/how-to-make-a-simple-mold-for-lost-wax-casting

https://www.martinpierce.com/blog/how-to-cast-bronze-butteflies-good-and-bad-runners-and-gates

STAGE 4 – Wax replicas and shelling

The lost wax method requires a wax replica to be made for all the component parts needed to make one piece. The Hedgerow door lever for example require 4 waxes to be made; one for the escutcheon, one for the lever, 2 for the tree canopy. The waxes are then dipped in a silicone slurry that when hardened forms a shell that encases the wax. An auto-clave is used to remove the wax (lost wax)  and the hollow shell is ready to receive molten metal.

https://www.martinpierce.com/blog/wine-cellar-door-handles-and-shell-casting

https://www.martinpierce.com/blog/using-wax-facsimiles-to-create-bronze-door-handles

 https://www.martinpierce.com/blog/hawaiian-theme-door-handle

https://www.martinpierce.com/blog/creating-a-custom-appliance-pull-using-the-lost-wax-process-the-wax-stage

 https://www.martinpierce.com/blog/limited-edition-door-handles

Wax replicas ready to be shelled


Dragon and Netsuke Door Knobs

Dragon and Netsuke Door Knobs


Dragons appear in fictional literature and are brilliantly described in the witty tale “Guards,Guards!” by Terry Pratchett. More recently they were portrayed as loyal protective demons in “Game of Thrones”. So, it will come as no surprise that we are adding a dragon door knob to our Netsuke collection.

Credit also needs to be given to Dr. Lisa Allen who ordered a Netsuke bumble bee and asked if we had plans for a dragon knob. We had not been planning an addition to the Netsuke collection so as an alternative, suggested Lisa order the lizard knob. If one looks at the portrayal of dragons in different times and cultures they range from serpentine winged creatures to horned scaly lizard-like creatures not unlike the Komodo “dragon” lizard found in Indonesia. Lisa was not to be persuaded by my lizard argument, so Martin turned to his sketch pad to wait for dragon inspiration.

Original Pattern Carved in High Density Foam - Finer Details then Carved into Applied Gesso

What follows is an account of how the dragon knob was designed, carved and by use of lost wax casting will soon take flight as a bronze door knob.

As the Dragon knob will become part of the Netsuke collection we used the compactness inherent in this collection as a focal point. This meant that the dragon had to fold in and around itself and cling tightly to the center of the knob to form an ergonomically pleasing shape that had few jagged protrusions. The tight compact and smooth design characterizes the bee, lizard, rabbit and frog knobs and is why the collection is named Netsuke after the early smooth animal toggles used as fasteners for garments and satchels in traditional Japanese clothing.