Unusual Refrigerator Door Handles - what to consider

High end refrigerator manufactures like Sub-zero allow consumers to customize the look of their refrigerator by selecting handles that will complement the style of their cabinet handles but deciding what handles will work both aesthetically and practically can be a challenge.

As a door hardware designer and manufacturer we thought we should review some of our handles to see which do and don’t work well for this use.

Before reviewing the styles there are some practical points to consider;

1.       You will need to order your refrigerator without the manufacturer’s standard issue handles and without the door being pre-drilled for the standard handle and also without the standard mounting brackets. The manufacturer will have their own door handle size and this is unlikely to be the same as the custom alternative.

2.       The alternative custom handle can then be installed either directly onto the refrigerator door or on to a custom panel that is being fabricated by your kitchen cabinet maker.

3.       Door pulls or grips rather than knobs work best as they allow you to more easily open the refrigerator if your hands are wet or full. A round or flat 90 degree angle is sadly the typical style for most refrigerator pulls and while these are easy to grip they are typically non-descript so use this as your practical starting point.

4.       While there is no standard length that is recommended for a refrigerator the grip will need to be attached at 2 points to the door panel and will need to be sturdy enough in size and width to easily open the door without difficulty and without coming lose after repeated use.

5.       You will need a professional cabinet maker or contractor to install the alternative handle in accordance with any manufacturer warranty guidelines.

Styles that work:

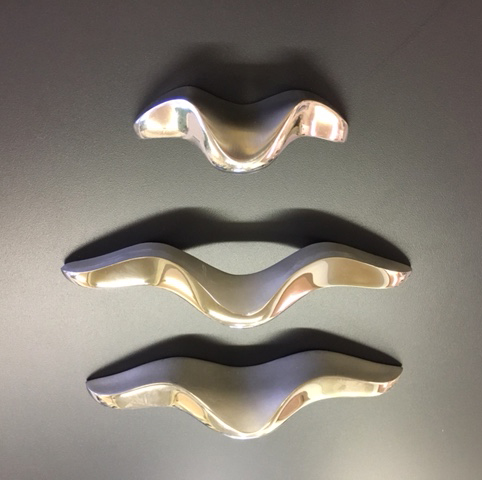
We see the kitchen area as a work space with surfaces that will need to be easily cleaned. My preference is to use more fluid slick styles without a lot of undercuts or filigree that will be difficult to clean. The Ergo and Morphic styles with the exception of the Morphic cylinder are good choices and look wonderful in stainless steel which will complement most refrigerator doors.

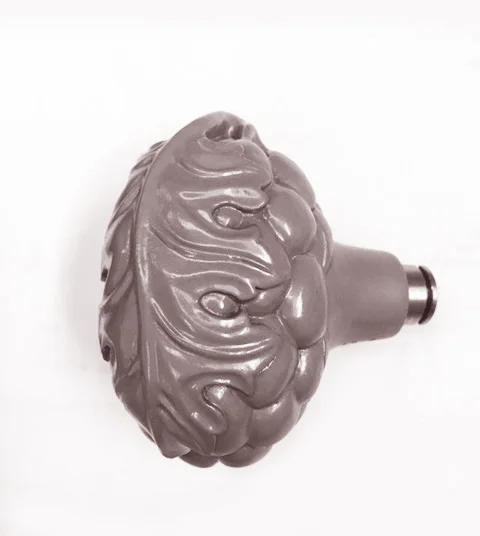
If you are using a wooden custom door then consider the Morphic and Ergo styles in bronze but with a baked enamel clear protective coating to help.

TIGER DOOR HANDLE VIDEO

The Tiger Door Handle can now be seen in all of his different LED colors in a recent video created by Jeff Jenkins of OneFoxTwoFox. The video can be viewed on our website or on our YouTube  channel where we also show videos for our door handle styles as well our other lighting products.

When time permits we work with Jeff Jenkins to shoot as much of our product as possible as the video medium allows us to really show the scale, texture and different perspectives of our work that cannot easily be captured in static photography.

We are currently and incrementally shooting a video which will feature our new long door grips as they move from the design stage to becoming epic 5’ tall door handles. The first piece in this series will be the Ergo extended pull which began life as a 12” cabinet handle that evolved into a 35” door grip and that has now grown to a 55” grip. The long grip video will also feature some current pieces that have been commissioned as custom pulls for a hospitality project in Houston.

Our work on the new Hedgerow door handle is the subject of a second video which documents Martin Pierce’s  skill as a wood carver and shows the development of this new handle from being a series of carved wooden patterns to becoming a series of wax replicas to finally taking form as a bronze door handle.

Tiger Illuminated Door Handle

Tiger Design for Illuminated Door Handle latest piece from Martin Pierce

The new Tiger Illuminated Door Handle has now been released into the wild or at least that is how we sometimes feel about the internet.  We have in previous posts explained how the pattern was created with old world skills using a scroll saw and aluminum sheet to create a durable pattern for lost wax casting. We have now completed  our first stainless steel castings and using energy efficient LED strip lights have created a color changing and single color illuminated Tiger door handle.


As is the case with all of  illuminated door pulls, the Tiger panel is  directly wired  with 22 gauge fine wires that are fed through the door frame into the decorative door panel.  The power is typically delivered to the door through an electric hinge and then conveyed to the handle through a low gauge harness that comes with the fixture and is ready for connection to a class 2 power supply.  

The Tiger door pull is UL listed and is lit with a flexible weatherproof strip  and encased in stainless steel which is corrosion resistant and durable.

Tiger is the fourth  piece in our collection of  illuminated door handles which include  Fish, Coral, and Morphic themes.

Work is continuing on the Hedgerow new tree handles  but as with any new design of this size and complexity there have been quite a few challenges to resolve and as we are now incorporating LED lights and have a left and right facing handle we have had a lot to think through.

Other illuminated designs are taking shape in Martin’s sketch book so stay in touch to see these as they evolve.

HAPPY HALLOWEEN

While we do not presently offer zombie door handles or other flesh eating creatures we do have a few lizards to celebrate Halloween with and there is a definitely an audience out there that demonize these reptile.

If you are  searching for air born winged demons then look no further as we have a left and right facing bat to add a note of horror or whimsy to your cabinetry.

Bats are left and right facing making them more ergonomic for the left handed amongst us. Their directional nature is also useful for the majority of kitchens where you have double doors or where you are looking to match the “handing” of your door. The challenges of door handing have been discussed in previous posts.

For those who associate toads with Halloween we can help you with our leaping tree frogs as cabinet pulls or with frog knobs for your interior or exterior doors.

In short we have a variety of Halloween offerings to choose from and hope the artistry of our designs as well as the medium of bronze will help your choice outlive the shortness of this macabre holiday. Enjoy.  


Moths a Brief Departure From Cabinet Knobs

Occasionally we escape from the demands of making cabinet pulls and make pieces for the sheer fun of it and this was the case recently when Martin decided to make 2 bangles to celebrate this writer’s birthday. Since bronze is a heavy alloy and since the lost wax casting process is lengthy,  Martin turned to 1/16" sheet copper to create these 2 pieces.

Lunar moths were the subject of choice, as their significant wing size and shape were well suited to artistic manipulation. 

For readers familiar with our previous posts on pattern making the techniques and tools used will come as no surprise.

Moth Bangle.jpg

The shape of the lunar moth was drawn free hand onto the copper sheet and the moth was cut out using a scroll saw. The rough edged piece was then filed using a fine tapered steel file. The outline of the moth was then traced onto the surface of a thick block of walnut and the wing veins added. The veins were then carved into the walnut block using a variety of gouge chisels to create depressed channels.

The copper moth was annealed with a blow torch that turned it purple and rendered it softer to work. Using 3/8" steel hex bolts Martin made 3 hand punches to work the copper. Having marked the wing veins on the copper moth he then placed it over the walnut block and aligned the wood and copper veins and beat the metal into the channels. 

Moths are featured in our animal and insect cabinet pull collection

The bangle was buffed on a buffing wheel to remove the coloring created by annealing and to remove tool marks. The dark accents were added using M20 by Birchwood Technologies that has been covered in earlier pieces.


How to make a simple mold for lost wax casting

Over time all things age and the longevity of a mold will depend on the composition of the mold material and frequency of use. We make a variety of  molds some require metal or fiberglass reinforcement and are not ideally suited for home use but others are possible to make at home provided you are patient and dexterous.

Our frog cabinet pulls are a popular item but we still make these by using a simple gravity pour rather than injection method to create the wax replicas for our lost wax castings.

The frog mold is a 2 part mold that is held together by simple peaks in one half of the mold and troughs in the other half mold that act as keys to tie the mold together. The troughs or holes are created using a drill bit or punch which is pushed into the modeling clay that holds the pattern in place. As this is a 2 part mold the skill comes in delicately building up the modeling clay up one half of the pattern without breaking of the small frog digits.

Once the frog is secure in modeling clay and all undercuts have been filled in we apply 3 or 4 coats of silicone rubber with a paint brush, we use Mold Max 30 by Smooth-on. After the silicon rubber is set we reinforce the mold with a more rigid plaster compound called Plasti Paste 11 by the same manufacturer.

stages of mold making .jpg

Next we make the second half of the mold which will have the peaks that align with the troughs. First we spray on a mold release agent onto the female mold, we use  Ease Release 200 by Mann Technologies. We then apply more of the silicon rubber to the mold which will collect in the troughs.  We repeat the process described and once we have created a rigid case in Plasti Paste we are ready to start using our mold to create waxes. The release agent allows the 2 halves of the mold to separate, we then can remove the pattern and now we have a hollow space to receive the wax.

Useful sources

https://www.smooth-on.com/

www.moldreleases.com

Colorful Door Hardware - How to Use Hot Patinas

Nature is a strong and continuous source of inspiration for our door handles and cabinet pulls so I wanted to complete this series of posts with a few pictures that illustrate this as well as providing information on how our yellow and maroon color patinas are made.

The dragonfly cabinet pull is an example of a hot chemical patina created with Sculpt Nouveau’s red and yellow dye oxide that are mixed together to create a maroon color.

To create the yellow amber tones of the butterfly we use a yellow and white dye oxide which we apply to the heated butterfly and once the desired color has been reached and after the pull has cooled down we apply small black wing markings with a  fine paint brush and a cold patina M20 product  by Birchwood Technologies.

The process for all of our hot patina finishes is the same;

Buff the bronze pull by hand or by using a buffing wheel buffing wheel and buffing disks, progressing as needed, from medium grit to fine grit disks. The disks we use are made by Standard Abrasives and made from a tough resin reinforced nylon fiber with aluminum oxide which acts as an abrasive element. Since the nylon web is un-woven it is more flexible and so will follow the contours of the bronze.

Dragonflies.jpg

To remove fiber particles, dust or other surface impurities we clean the piece with an air pressure hose.

Blend the liquid oxides in a non-reactive container to achieve the desired color.

Heat the pull to about 200° and apply the dye oxide blend to the areas you want to color with a very fine paint brush.

After the casting has cooled re-buff any areas that need to be re-worked or where you want to expose the golden color of the raw bronze.

Seal with a clear wax or use tinted waxes to create to add a different hue.

Sources:

www.sculptnouveau.com

www.birchwoodtechnologies.com

www.birchwoodtechnologies.com


Color in Nature and Hot Patinas for Door Handles

The green anole lizard was the inspirational basis of Martin Pierce’s lizard door lever. The lizard’s vivid pea green color is however a challenging finish to capture as a bronze patina and one that requires considerable dexterity and access to a blow torch, so hobbyists should proceed with caution.

While the lizard door knob is not of the anole family, as you can see from the photo below he is often specified by customers who want a similar finish to match his mate.

In an earlier post we described how to create an antique patina on bronze by using Birchwood Technologies' M20 product and how this chemical solution, through chemical conversion, creates a brown black patina that penetrates and bonds with the bronze. The cold patina process is a necessary first step that has to be taken before moving on to create a  hot green patina as without it, the green solution will tend to slough of the surface of the bronze. Once the blackened piece has dried it is then gently burnished to remove some of the cold patina from the lizard area. We mix white, pea green and yellow dye oxides, available through Sculpt Nouveau, to create the right shade of green which is applied several times to the handle to achieve the right hue. Throughout the hot patina process the handle is kept at a temperature of about 200° by using a blow torch.

Nature inspired door handle.jpg

The vivid greens are used by many creatures as camouflage that allow them to blend in with surrounding flora as is the case with this praying mantis that was wonderfully hidden in the variegated tones of this begonia vine.

Shedding Light on a Tiger Door Handle

The Bengal tiger is a striking grand cat whose features and expressions are legendary and whose appearance have landed him the spot of national animal for both India and Bangladesh. Most of us have the black and tan markings of this splendid creature filed away in our memory banks for rapid recall. With this in mind, Martin Pierce tackled the task of creating a tiger handle with cautious enthusiasm. The technical challenge was in deciding where to create perforations in the panel for light to pass through but without compromising the strength of the panel.  The other challenge was how to capture the tigers marking and here Martin used a lot of artistic license.

As the end product was to be a flat panel with cut out sections the piece had to be designed so that the cut-out areas, when removed, left behind one continuous interlocked shape. In nature the Bengal tigers black markings are separate and unconnected but in Martin’s design the markings all connect. The tiger design was created as a black and white drawing with the black areas representing areas that would be left as steel and the white areas being the cut-out sections where the light source would shine through.

Tiger pattern.jpg

For panel patterns Martin has found aluminum to be an ideal metal as it is strong enough not to warp or distort when cut, yet soft  enough to be cut on a scroll saw. The saw operates very much like a sewing machine with the aluminum pattern being maneuvered and pushed into the path of the vertical blade very much as a garment is pushed toward a vertically moving needle.

In the next few weeks we will show how this new piece evolved to become an illuminated handle.


How to Create Oil Rubbed Patinas for Bronze Door Handles

Our bronze door handles are offered in a variety of hot and cold patinas but the most popular c are our light and dark antique patinas. I hope to explain how we create these 2 patinas step by step using our daisy cabinet pull to demonstrate the process.

Over time bronze will develop its unique patina and its surface color can range from brown to black to blue or green as it reacts to the chemical properties in the local atmosphere and as the surface of the bronze begins to oxidize. With our antique finishes we try to emulate the brown and black surface tones to create a controlled aged appearance.  To do so we use a product made by Birchwood Technologies called   M20 Antique Black. Their solution, unlike pigmented stains, does not sit on the surface of the metal but rather through chemical conversion it creates a 3 to 4 micron thick patina.  However, before this process happens the bronze handle must be cleaned.

Surface Preparation

Our castings are first placed in a sealed and pressurized chamber and glass beads made from fine silica are air- sprayed into the chamber to remove  small casting burrs or rough particles.

We then remove even smaller burrs or scratches with a buffing wheel and disks, progressing as needed, from medium grit to fine grit disks. The disks we use are made by Standard Abrasives and made from a tough resin reinforced nylon fiber with aluminum oxide which acts as an abrasive element. Since the nylon web is un-woven it is more flexible and so will follow the contours of the bronze.

To remove fiber particles, dust or other surface impurities we clean the piece with an air pressure hose.

Patina by Conversion Coating

Using M20 we make our own solution using 1 part M20 and 1 part distilled water mixed in a non-reactive dipping vessel.  The piece is immersed for 30 to 60 seconds and then neutralized by immersion into another vessel of distilled water.  If,upon inspection, we see that certain areas have not reacted to the solution and are still bright we re-clean those areas and dip again.

Highlighting

As you can see from the # 3 above the chemical conversion creates a fairly uniform patina which is somewhat drab. To create greater contrast we gently and strategically burnish by hand areas with a fine nylon abrasive pad and thereby re-expose the golden tones of the bronze casting.

Sealing

To seal the bronze we use a soft cloth to apply 2 coats of oil and once dry, finish with hard wax. There are many  products to choose from but we have found Sculpt Nouveau’s  metal oil and black wax easy to work with see useful links below.


Usefullinks:

http://www.standardabrasives.com/

http://www.sculptnouveau.com/

https://www.birchwoodtechnologies.com/

Tall Door Grips - How the Design Begins

Lately, in large part at the behest of designers, we have begun to design some very grand scaled door grips for the public areas of hotels and clubs. The size and shape of a door handle does influence the handles design, with long narrow grips dictating a more compact motif and with wider panels allowing for a more expansive forms.

In short, our designs for tall door grips fall broadly into these 2 categories and we have begun by focusing first on the more restrictive long thin pulls which one typically sees on storefront and bank doors and with lengths varying from 40” to 72”. We are using 60” as our optimum design canvas and are creating decorative segments of 18” and 24” that can be repeated or interspersed with other designs or plainer sections so that we have the capability of creating custom lengths for each project.

The segmented and narrow width of our design canvas impacts the freedom, balance and logic of our design. As a starting point Martin began by looking to the utilitarian and geometric shapes of the 1920’s Art Déco period and the influence of these repetitive bold lines can be seen in the sketch below. He also used his own Hedgerow furniture designs to create an angular tree branch motif.   These sketches are at this point concept drawings and we will be refining them over the next few weeks.

tall grip designs.jpg

New Grapevine Door Knob Added to Wine Cellar Door Handle Collection

Our grapevine door handle collection has, until now, focused on capturing the gnarly quality of vine stems and the distinctive serrated shape of their leaves, with less attention on the grapes themselves.  This focus worked well for creating long door grips and horizontal door levers but was not well suited for a door knob.  

With this in mind, we began work on a new vine door knob and in our July 12th post  shared with you how Martin Pierce created detailed  perspective drawings as guidelines for his 3 dimensional wood pattern. The pattern was carved in basswood, sealed with primer and used to create a 2 piece hollow core mold. Red wax was poured into the mold and several wax replicas were made. The wax facsimiles were then coated with successive layers of fine ceramic slurry to form an outer wall and the pieces  were baked to form a rigid ceramic shell.  Once baked, the ceramic shells were  heated in a de-waxing  autoclave and steam was  pumped into the shell to remove the wax. The wax was then  filtered, cleaned  and  recycled for future use. The de-waxed shell was subsequently invested with molten bronze and after cooling, the gates that delivered the fluid metal were ground away and the bronze casting was ready to “chased” or refined by hand.

Seven weeks later and we have now machined our first castings, added the spindle and  internal springs, fitted our existing vine leaf back-plate and finished by hand our first pieces.  We hope you like this new addition to the collection.


New LED Door Handles and The Year in Review

As we move on to the post eclipse week we thought we thought it would be fitting to give an updated report on what milestones we have met and what lie ahead.

Following on from the successful listing of our LED lit door handles and wall sconces we have completed our initial UL inspection and so designers may be assured that the our UL approved fixtures will bare an indelible UL label. To help designers understand our LED single color and color changing fixtures we have developed a series of helpful installation diagrams as well as charts that will help explain what accessories will work best with our products to view these please download our pdf for Coral or our Illuminated products.

While the LED lighting scene constantly evolves with smaller brighter and more energy efficient units our focus is on designing and making decorative fixtures that work with this new technology. Our fixtures are hard wired and illuminated either by a small spot or by a strip of LED chips. The type of LED impacts our design, as spots are better suited to our round, down lit sconces and cylinders, while the linear strip inside the perimeter of our door panels project a forward directional light that we use to create our fish and coral shapes. The next piece in development for our panel series is a tiger design which will soon be released. The panel concept is also being extended to include a longer rectangular 26" x 4" panel and the first piece will be from our Willow designs.

LED Entry Door Handles - Door considerations

Our new illuminated door pulls are hard wired and not battery dependent and I was recently asked how this impacts the type of door chosen.

For some time door lock manufacturers have been making electric mortise and deadbolt locks that can be powered by low voltage wires that release either the bolt or the strike and often this is done by a remote controller.

Our illuminated door handles have the same needs and require;

Power to be supplied to the door

One of the easiest methods of supplying power to the door is through an electric door hinge.  Power coming from a low voltage class 2 power supply is delivered to the door jamb into the fixed section of the hinge. The wires then pass through the knuckle or center section of the hinge and on to the operative part of the hinge which is attached to the door itself and which pivots the door open.  Electric hinges have the advantage of concealing the wires used to power door handles and locks and most can be ordered for these low voltage applications.


A concealed door loop like the one by Command Access is a low profile alternative to the electric hinge and one that can be freely positioned anywhere on the jamb. While its unobtrusive design and size make it attractive you will still need a hinge to open and close the door. If you are looking for an equally discreet electric hinge you may want to consider the hinge options from Simonswerk.com who offer some very sleek concealed hinges that function in the same way as the surface mounted version but are recessed and flush with both the door jamb and door edge. These hinges will require a reasonably solid outer door edge that can be routed out for the hinge plate.

Off course the power can always be supplied  through a surface mounted conduit or metal arm which may be an option for commercial projects or areas where the reverse side of an entry door is less visible.

Hollow area for power channel

 To power the LED handle the wires from the handle will have to be routed through the door and connected to the power that is being delivered to the door jamb.  Provided the door has a hollow frame this should be relatively easy as the cables are small 22 gauge wires and can be fed through a channel in the door frame.  The top and bottom door rails for hollow metal doors will often have a separate cover that can be attached after the wire conduit has been fed through.

Impact on Door Design

In summary your door will need to have a hollow outer frame or pre-made channel designed into the construction so that cables can be fed through to the illuminated handle.  The channel can easily be incorporated into the construction design of the door and major door manufactures are already doing this so that the consumer can remotely open and lock the entry door using a remote controller to activate an electrically powered lock.

Ergonomic Hardware Adapted to Individual Needs

While there is a reasonable amount of door hardware that meets the legal requirements of the ADA it is often challenging to find artistic door handles that satisfy both the artistic and physical needs of any one client and their designer.

The Ergo collection derives its name from the adjective “ergonomic” being a design that is optimized for easy use in the workplace and when it was created, Martin Pierce developed a left and right knob and lever design with suitable cut outs and indentations that could be easily gripped by a left handed or right handed person. The style has evolved over time with modifications being made to slim down the lever for more universal comfort.

Though the Ergo series is ergonomic, not all pieces are ADA suitable. As we grow older our physical needs and challenges multiply but not in a homogeneous way so a generic approach to making hardware ADA compliant is no guarantee that the adapted hardware will work for all. Enter a skilled and sensitive designer versatile in specifying custom door hardware like Lambrino Christoff of Barton G Design. With Lambrino’ s input we recently re-designed our Ergo epic cabinet pull by scooping out the back to make a hollow that could easily be gripped using ones index and middle finger. See the image below showing the evolution of this piece, the middle picture shows the custom piece and the top and bottom pictures show the first and most recent cabinet pull in this collection.


For other designers we have modified our Ergo cabinet pull making the mounting posts taller thereby creating more space between the cabinet face and underside of the pull that can be gripped by several fingers together.


Bees - The Perfect Door Knob for Your Children's Bedroom

Following on with our nature theme I wanted to share a photo I took of a small swarm of bee door knobs. The bumble bee door knob is one of 4 members of the netsuke series, a collection that takes its name from the toggles that were used thorough out the centuries as compact buttons or fastener both in clothing and in luggage.

The frogs, lizards, rabbits and bees that make up this collection are often ordered as individual sets for children’s bedrooms but occasionally multiples are ordered to add a whimsical element to a commercial setting, as was the case with this swarm.

The bee that served as a model for this piece is the black bee or carpenter bee that we see here in southern California and that we first came across when travelling in Greece. We were captivated by its intense black shiny wing casings and abdomen and by its passive bumbling behavior. The honey comb back plate is a case for artistic license as this is not a honey creating bee of the social hive variety but a solitary nectar feeding bee that loves the nectar of honey suckle, wisteria, morning glory and other flowering plants. While the bee is able to use its proboscis to suck nectar from flowers with suitable trumpet shapes, if the fit is less than perfect it will cut the flower to access the nectar, or as we have seen in our garden, take full advantage of existing tares made by the voracious feeding activity of humming birds and their deep reaching beaks.

Carpenter bee finds wisteria a good source for nectar

Carpenter bee finds wisteria a good source for nectar

Cast in solid bronze, these pieces are wonderfulto hold and their smooth substantial weight fits nicely in one’s palm.


Wasp and Insect Cabinet Pulls

To say that Martin Pierce is fascinated by insects would be an understatement and it explains why insects and their habitat figure so much in his cabinet pulls as well as his paintings, sculpture and furniture. 

This fascination is not shared by all but we have found that many of our gardening neighbors understand the role that these creatures play in helping to keep their gardens free of voracious caterpillars and from the adult flies such white-fly that they become. At the weekend Martin was able to snap a shot of a beautiful mud dauber wasp, named for the way it daubs mud to create individual chambers for each of its lava.  The wasp catches a caterpillar and entombs it in the lava's pod like chamber thus providing a constant food source for the developing lava that when it pupates will emerge as a strikingly colored wasp. The nest chambers are equally impressive and are made of multiple layers of mud built up over a period of days that dry and harden to become robust adobe like homes. Once the caterpillar has been deposited the wasp then lays an egg on it and secures the chamber with more mud.

This architectural skill  is one that is found in other species and we have seen swallows build nests using a similar approach. What makes the dauber wasp awe inspiring is how she creates her chambers to be just the right size and strength to support the larder and her offspring. Where are her blueprints, where is her scaffolding, apparently they are not required.

Why our LED Door Handles are Suitable for Restaurants and Hotels

I was recently asked a seemingly simple question but on closer inspection realized that the answer deserved a better account of why our recently launched  illuminated door handles are appropriate for outdoor areas in hotels and restaurants.

Metal of the LED fixture
Not all metals are created equal but the premium metals of 304 and 316 stainless steel as well as silicone bronze all have good corrosion resistance and are not prone to rust when exposed to wet weather. The silicon bronze is typically oil finished so while it will not rust it will develop its own unique patina over time as it is a living finish.

Type of LED’s
Not all LED’s are suited to outdoor use. In our cylindrical pull we use a completely encased LED spot but for our Coral and Fish handles we use an LED strip that is wrapped in a silicone sheath to make it weatherproof.

Diffuser that doubles as a weather protector
Our fixtures all have an open area in the design through which the light passes but to diffuse the light and to eliminate any shadow created by the LED we add an acrylic diffuser that sits behind the face of the luminaire thereby creating a weather and insect barrier.

Weep hole
All of our luminaires come with a "weep" hole to allow the escape of water if it manages to get into the fixture.

Wiring
The wires that power our fixture pass through a concealed channel inside the door frame and then through an enclosed mounting bracket into the fixture and at the other end they pass through an electric hinge that is connected to the door jam and door channel ensuring thereby that the wires are not exposed to weather.


Process of making A New Grapevine Door Knob

The grapevine door knob continues to evolve.

It started out as a pencil sketch and then was “fleshed out” in a series of perspective drawings so that its scale and appearance could be assessed. Once all the angles were mapped out Martin began carving the pattern in basswood, which as any wood carver knows is an  easy to carve dense soft wood, perfect for carving fine detail and perfect for pattern making as it is a somewhat bland wood with almost no grain or color. The only real drawback to basswood comes from its lack of color which makes imperfections difficult to spot, so Martin sprays his patterns with grey primer thereby rendering them visible.


Once perfected, two rubber molds are created, one for the body of the door knob and one for the stem of the knob. Each mold is made in 2 halves that can be pulled apart after the wax has been poured into the cavity of the mold. The 2 halves of the mold are keyed to each other by creating a male and female rubber junction, that way the mold will continue to align properly over a long period of use.

rubber mold

The mold is then used to create a wax facsimile of the pattern. There are a large number of waxes to choose from and their pouring temperature, cooling time, density and pliancy are all factors that play a role in deciding which will work best for a given piece. The red wax shown here is a softer more pliant wax that has a low meting temperature and works well for gravity pouring but is less suited to molds where the wax is to be injected.

Red wax facsimile of wood pattern

Red wax facsimile of wood pattern

The next stage will be to shell the wax and eventually we will invest the shell with molten bronze, so stay tuned for the next installment.