Katydid Sculpture Takes Shape

The Katydid, sometimes called a green bush cricket or long horned grasshopper is a family of insects with 8,000 species. In California we see both the greater and lesser angle-winged species which were  reference points for Martin Pierce’s latest addition to his insect collection of  sculptures. The actual shape of his new piece though owes more of it’s design to the Mediterranean species but even this variety was adapted for stylistic and practical reasons  and made with wider wings.

 For those interested in the name Katydid it comes from the Greek word “tettix” meaning small cicada. Wikipedia enlightened this writer to the onomatopoeic  use of “ tettix” which when repeated makes a sound similar to one made by the Katydid when rubbing it’s wings together. Interestingly, the word Katydid  is also onomatopoeic as when repeated  “kat-y-did “imitates the stridulation of this insect.

When complete the Katydid will be considerably larger than other members of this species at a substantial 11” high by 16”long.

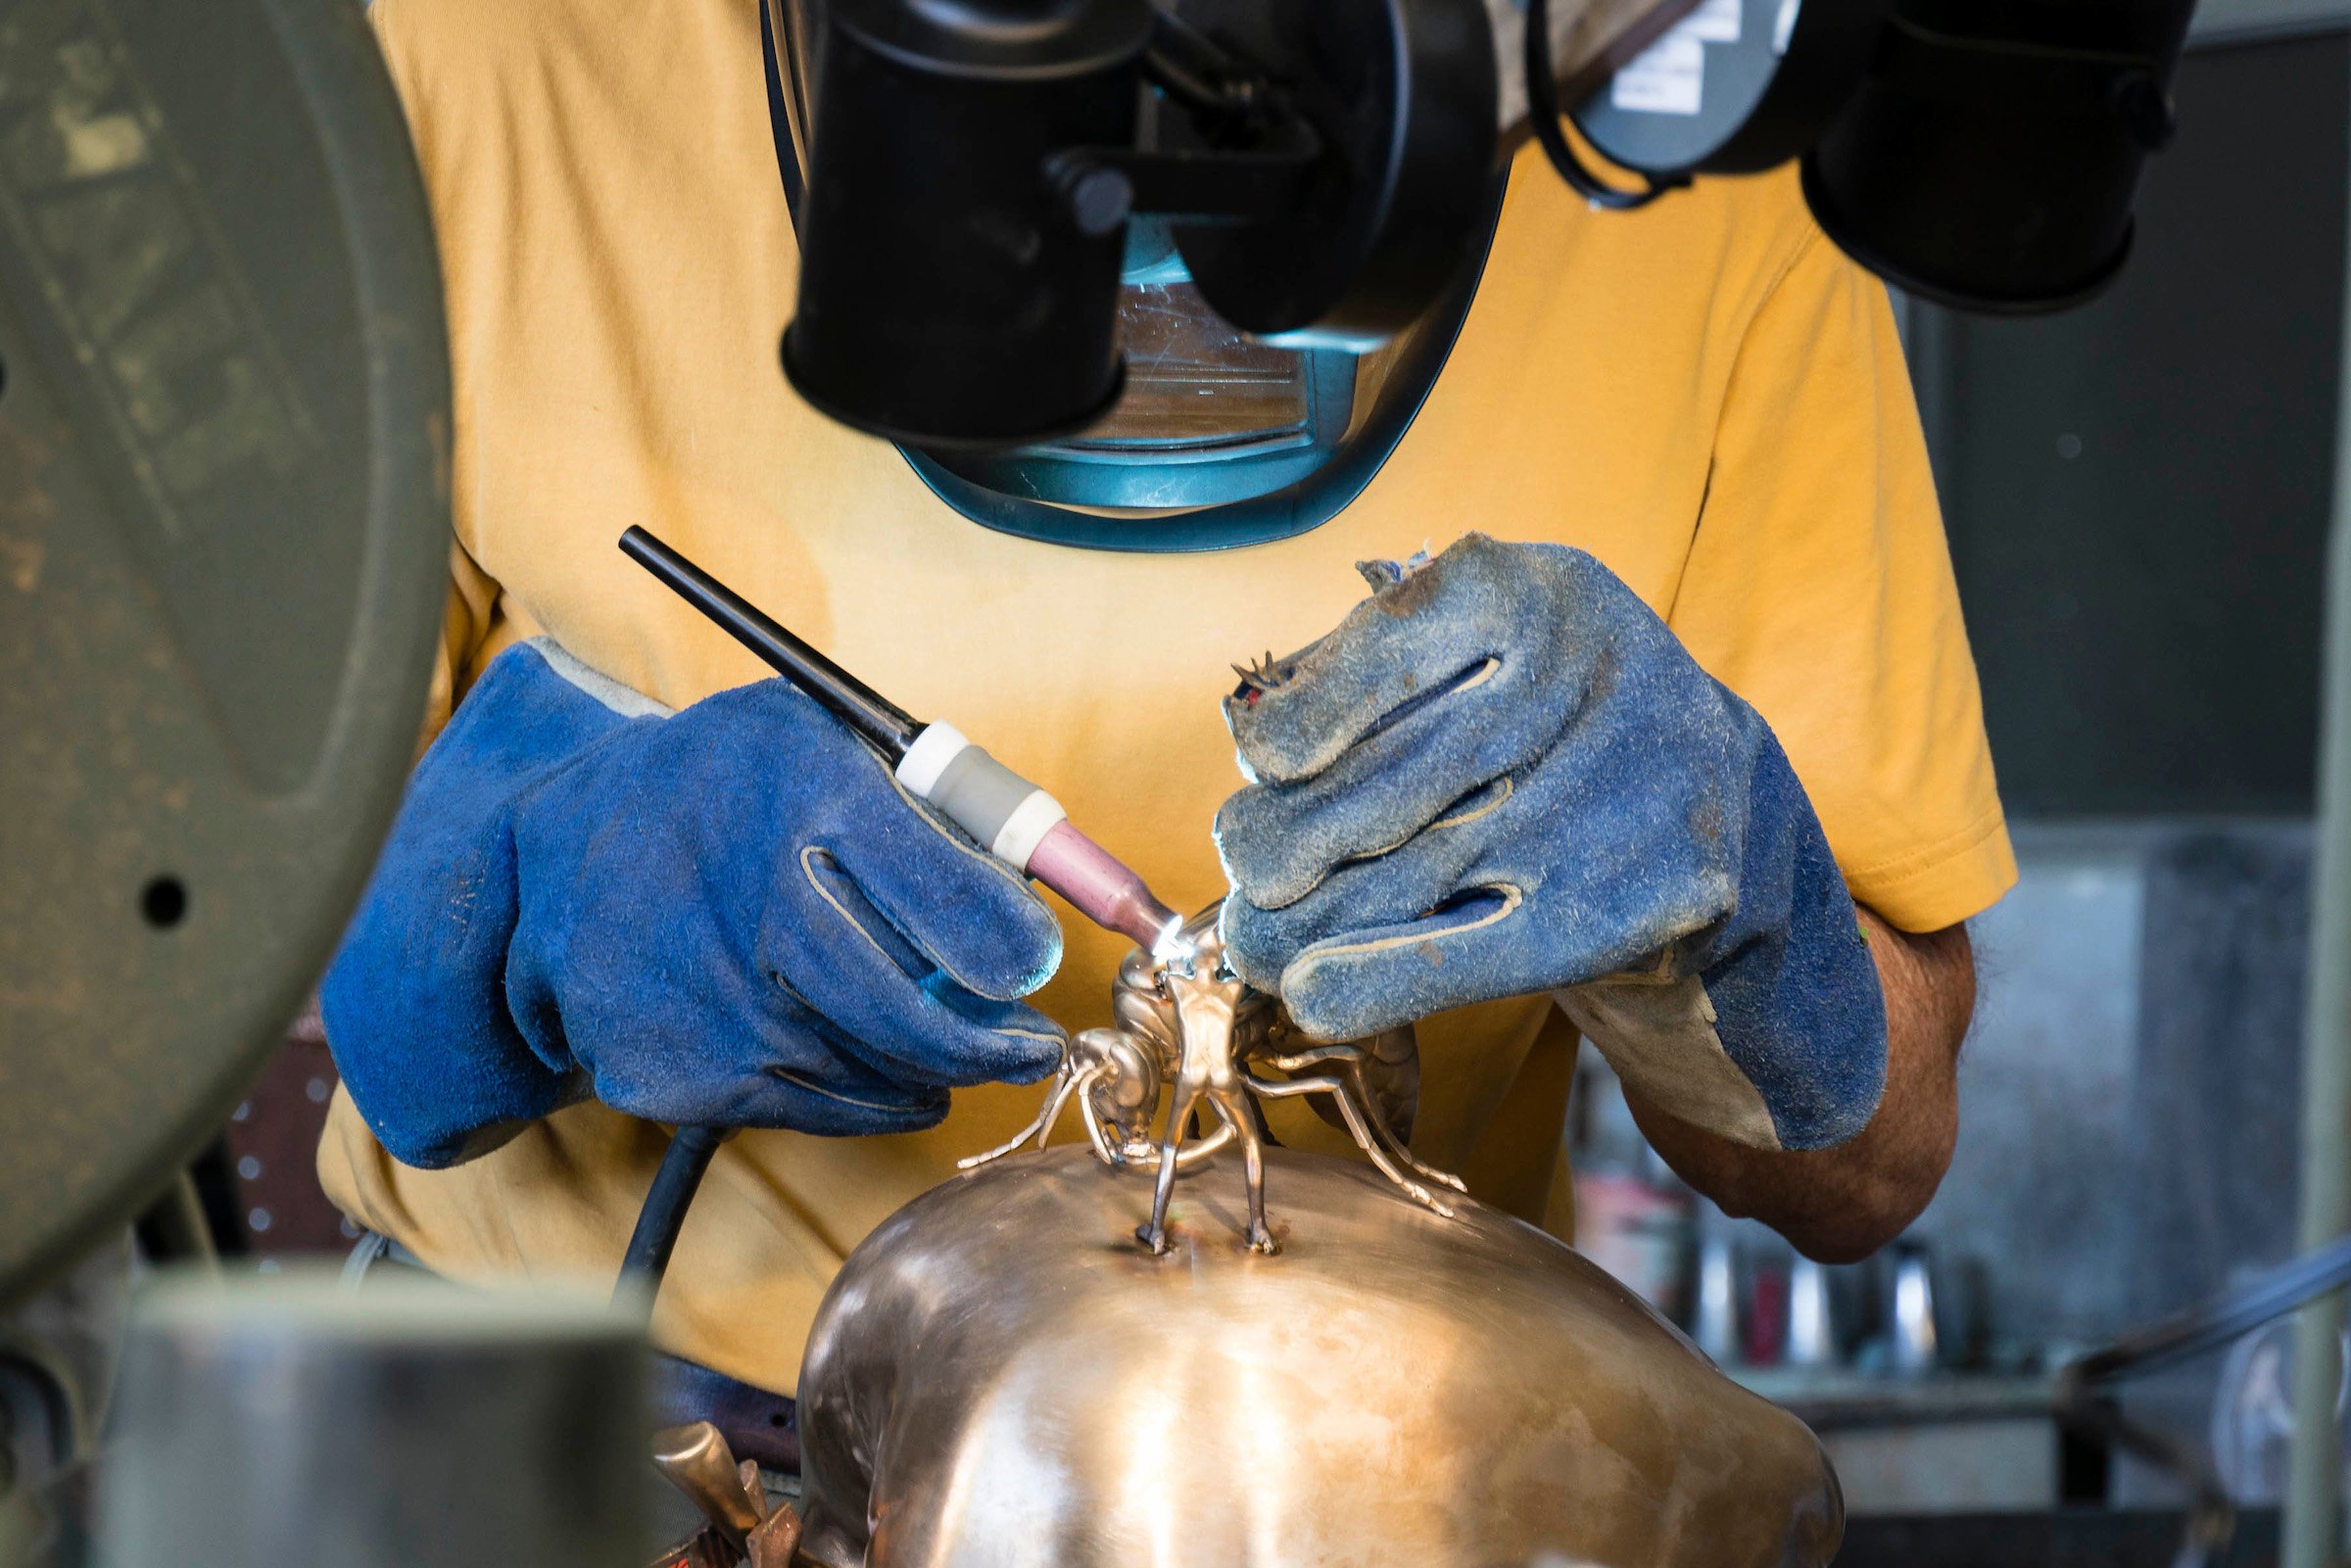
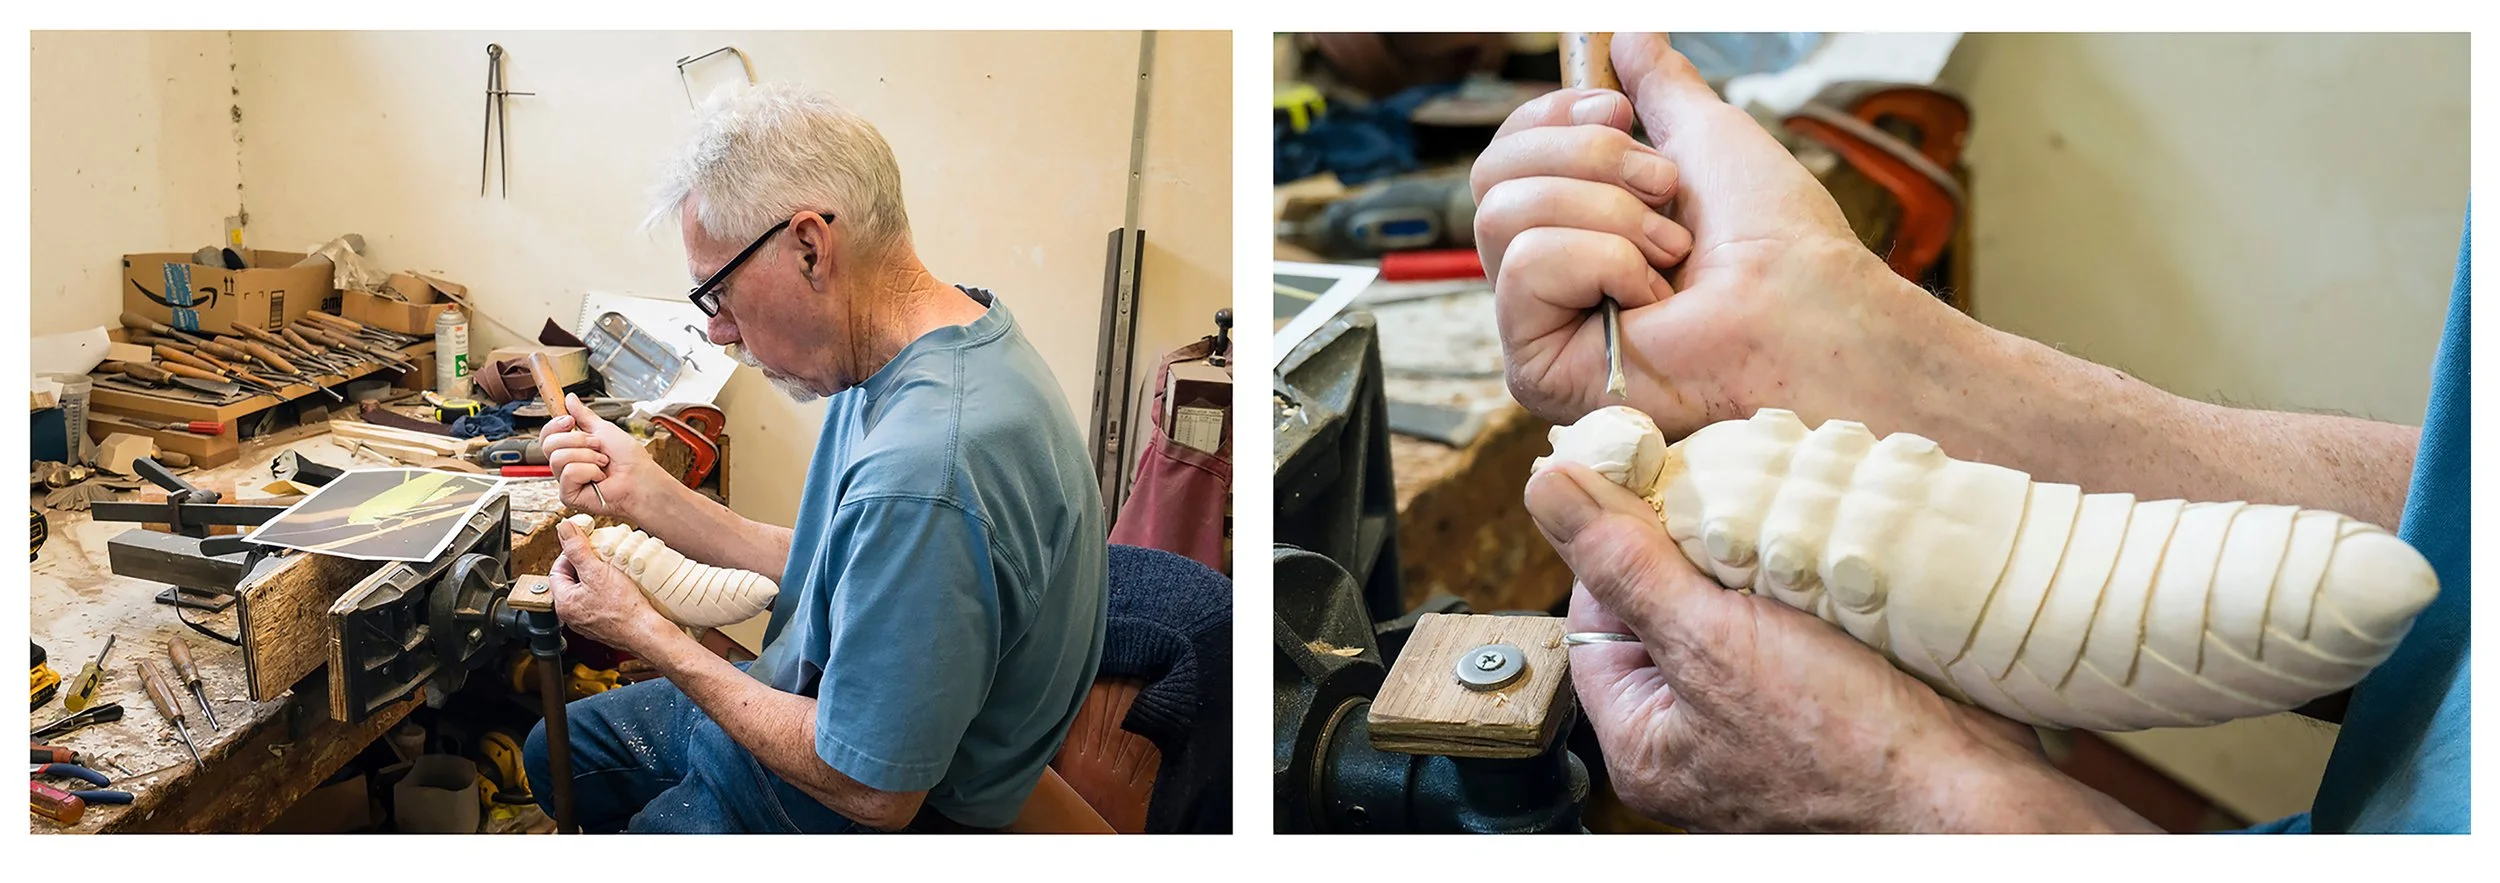
The progress photos shown here are provided courtesy of Maria Ramirez-Adams a fine art photographer and film maker.

 Having decided on the shape of the katydid, Martin enlarged his sketch and drew it as a scaled profile on vellum. The profile was then redrawn on thicker paper but as 6 separate body parts.

The profiles were used as patterns and each body section was crudely cut from solid basswood. Once cut the sections were carved with a variety of wood cutting chisels.

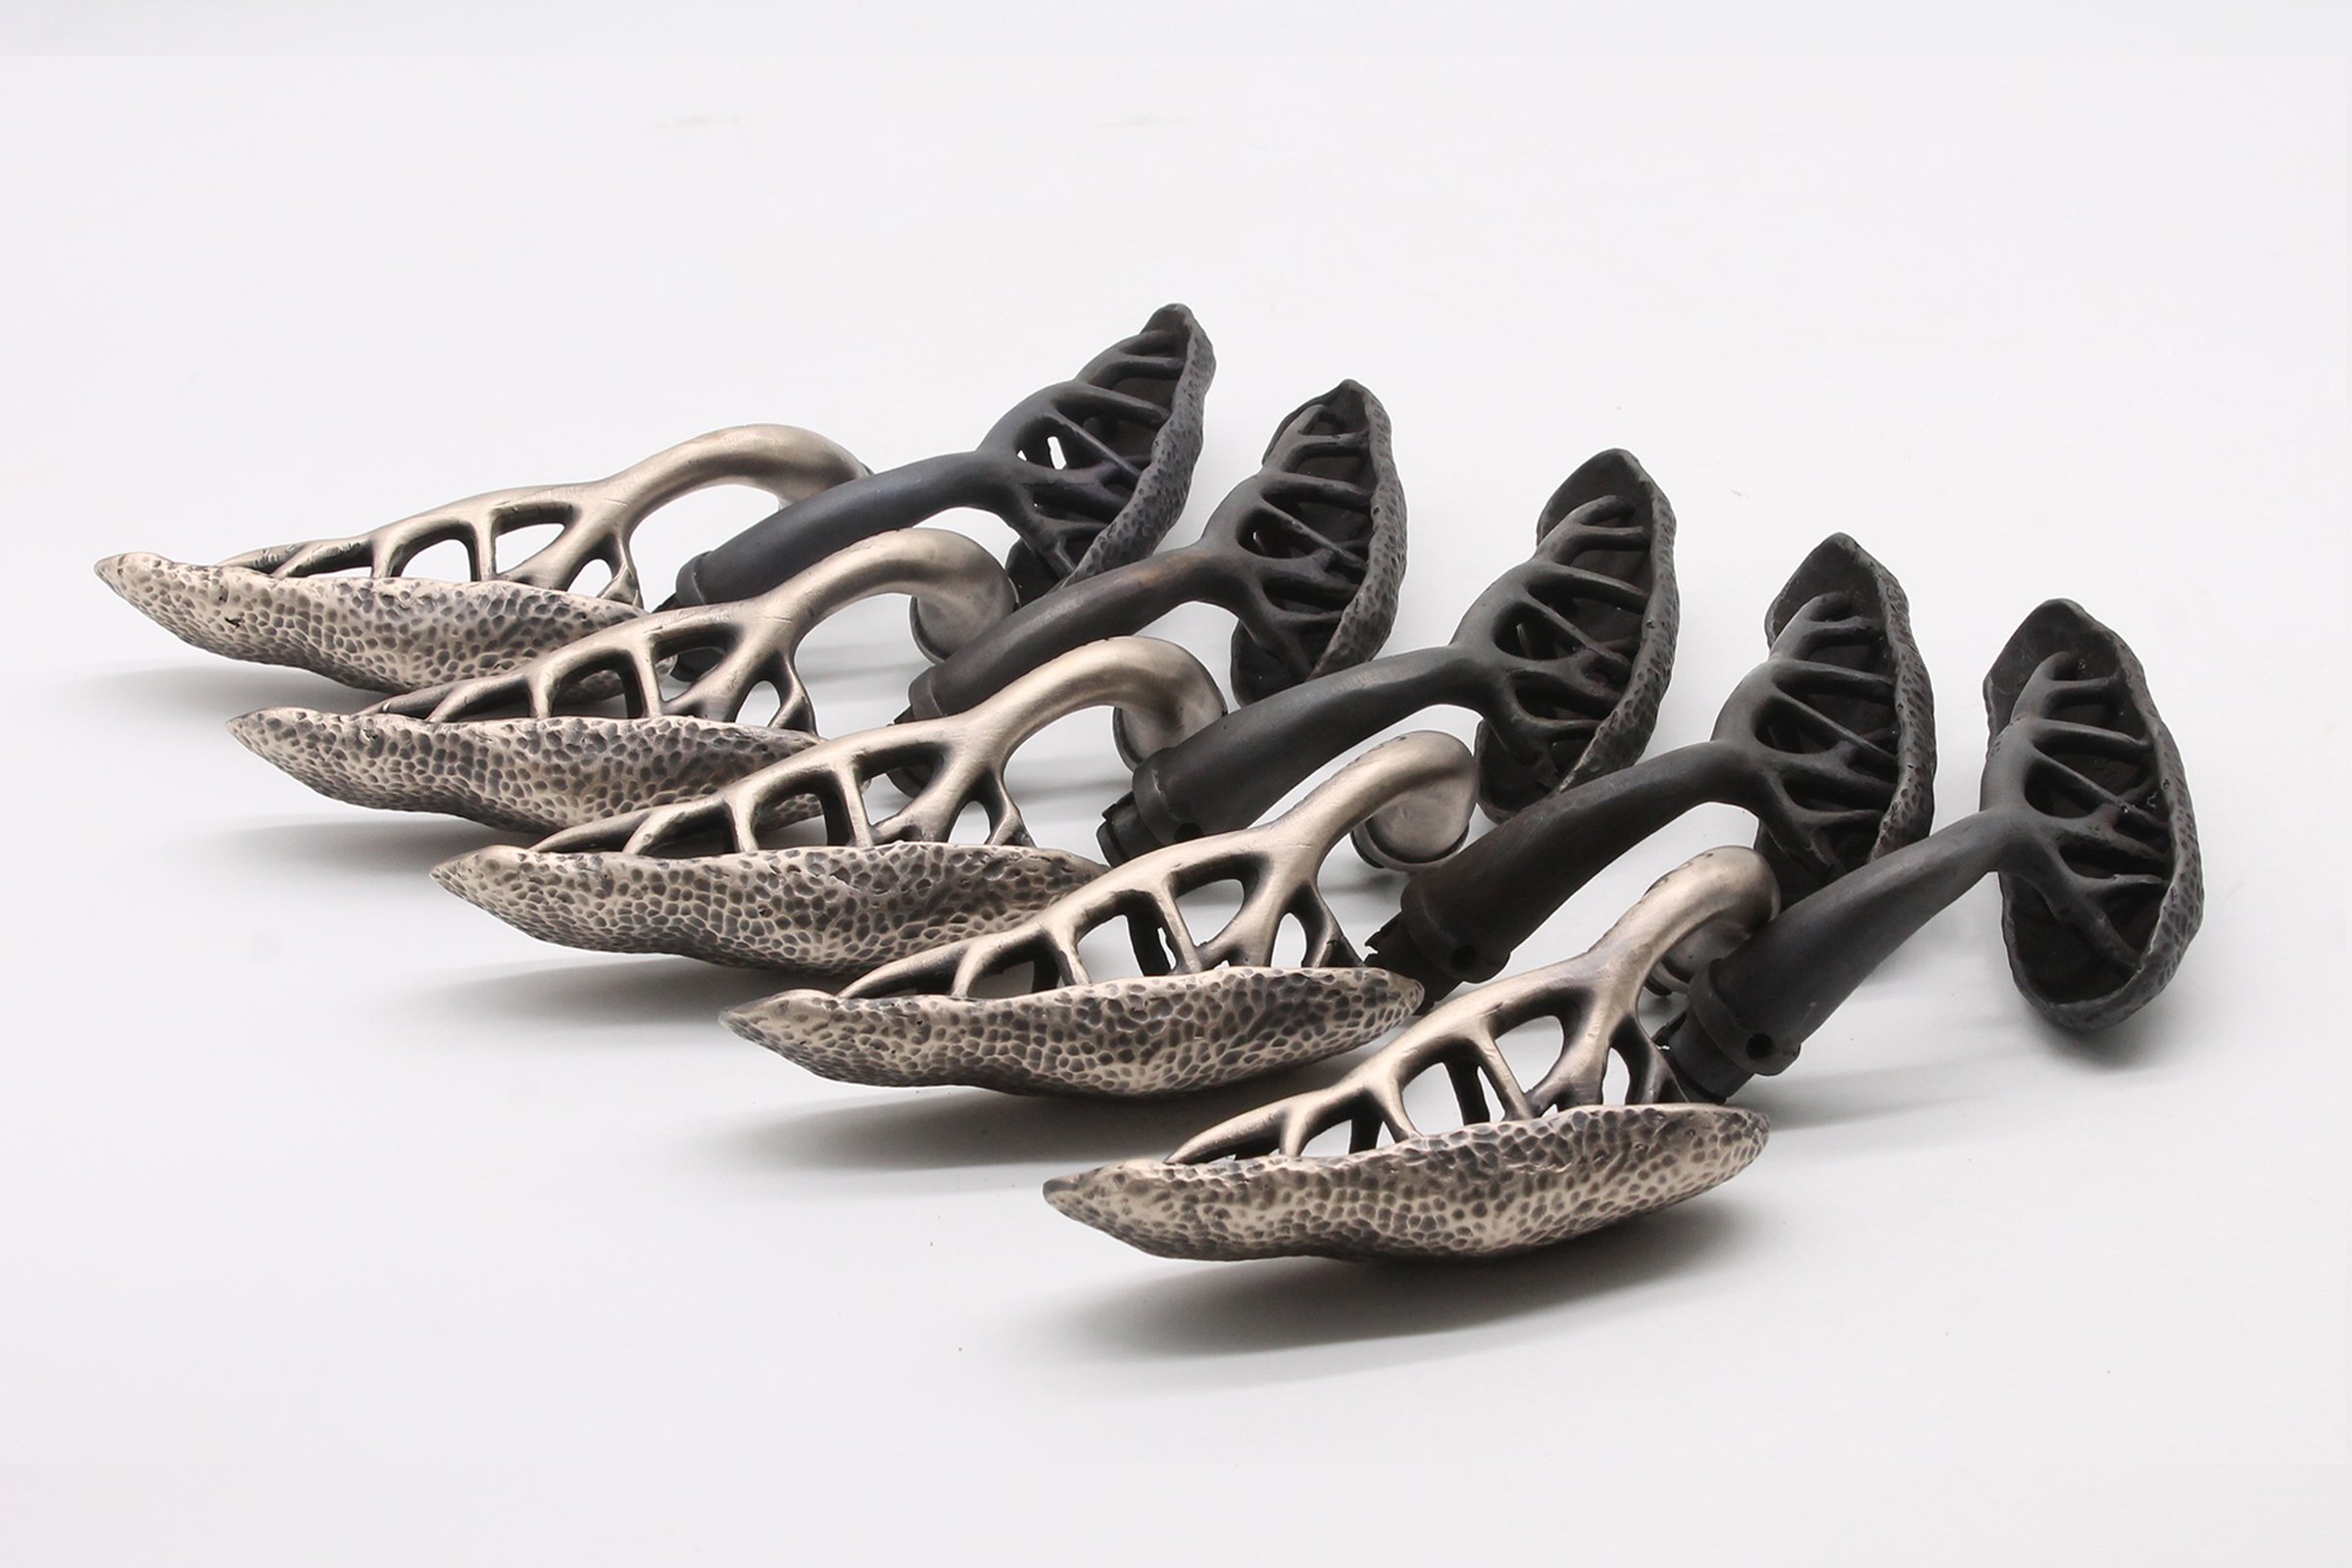
The 2 wings were cut from 1/8” plywood and were soaked in water to make them supple so they be could be twisted and bent around the thorax. Once the correct shape was formed, the wings were clamped and glued at the narrow thorax end and will be used to create a complex 3 part mold. The 2 wings were carved as a unit with a protective brace to prevent their fragile form from breaking. The outer main leaf veins were first carved and then the smaller veins were drawn and carved.

Entry Garden Gate Designs

Entry Gate statement 

An entry gate does not have to be large to make a statement as the photo below shows. Equally, if the budget restricts, the locking mechanism can be simpler.

The gate featured here was custom made in solid walnut with walnut veneer recessed panels.

 The top panels to the left and right of the gate measured 12” x 18” x ¼” and were cast in solid bronze and decorated with a small frog from our animal collection of cabinet pulls. While frogs were used on these panels, many pieces from our cabinet hardware collection would work equally well.

 Gate Entry Hardware

The entry way handle set is from our collection of wine cellar door handles and the large vine grip was part of an entry thumb latch set. While a mortise thumb latch to lever lock was used here, a simpler tubular lock could be substituted.

This would need to be called out at the time the set is ordered as the tubular latch has only one port for the thumb latch and lever unlike a mortise with 2 ports that are spaced apart to create a more comfortable distance between the stem grip and thumb piece. To create a similar spacing for a tubular latch we would position the grip lower during machining. The thumb piece in this configuration would be off center and would be a custom design that is currently in development and will be available at no additional cost.

Off- center thumb piece being developed for tubular deadbolt configuration with lever on inside

 Gate construction

Walnut with exposure to sun becomes lighter and golden and like bronze develops it’s own living patina. The solid sections were roughly chiseled to give a more hewn rustic appearance. The structure and design of the wooden gate are not daunting and in the hands of a good gate maker or wood worker would be easy to recreate and not unduly expensive. Choosing the best sealant to finish the wood and maintaining it on annual basis is critical as exposure to rain, humidity and sun will cause the wood to shrink, crack and deteriorate over time.

Classic Entry Door Handles

Thumb latch handle sets are often used in  traditional styles of door hardware to make a  grand entry statement. The thumb piece on the front side of the door is usually one small decorative detail on a much larger back-plate. The Hedgerow, Grapevine and Willow collections all contain a thumb-latch entry set and we have designed to be an integral part of each set.

We also use the same mechanism on the Lizard entryway set where a less traditional butterfly is the thumb piece.

Understanding the function of the thumb piece

The thumb piece is used to activate the door latch that keeps the door closed. Our thumb latch sets have been designed for use with mortise locks which house the latch and deadbolt mechanism within a solid 6”H x 3”D x ½”W metal case installed inside the body of the door. The thumb piece has a seesaw motion so pressing down on the exposed thumb end pushes up the end that sits within the mortise box underneath the toggle area. When pushed up by the thumb piece the toggle plate pivots backwards which triggers a hammer plate backwards thereby releasing the latch and spring which kept the latch extended and the door closed. The hammer and spring, when released allow the latch to return into the body of the mortise thereby allowing the door to be pulled open.


Patinas For Hardware and Sculpture

In previous pieces we have covered  our standard light and dark antique patinas. For custom orders we also offer a hot patina, which is applied to pre-heated bronze. We limit these finishes to just a  few pieces, that include the  small butterfly pull, which can be special ordered in amber- yellow; the frog knob, which can be ordered in a blue green, and the lizard lever or knob which we can patina pea green.

Sandblasted brushed - patina ready Cold antique bronze patina Pea-green hot patina

With our new bronze sculptures, we are developing patinas made with ferric nitrate as well as liver- of sulphur. Ferric Nitrate is a chemical compound of iron powder, nitric acid and it produces a  rust red patina. Liver-of-sulphur  is a chemical compound of powdered sulphur, sodium, and water. They are applied to the sculpture with a spray bottle or brush and the sculpture is preheated to a temperature of approximately 100°to 200°depending on the chemical and dilution. As the sculpture is hot, the wet patina attaches to the surface and the moisture evaporates quickly leaving behind a layer of color.

The colors these patinas produce on bronze can vary from gold to brown to red to dark red to black, depending on how hot the piece is, and how many coats are applied. The chemicals below can be mixed and diluted to produce a wide range of hues. They can also be applied over each other provided the previous patina has sufficiently dried. By layering the patinas and by using brushes and different spraying methods it is possible to develop deep mottled colors and effects. It has taken a lot of practice and years of trial and error to create the look we are seeking for each sculpture.

1. Scotch bright surface 2. Sulphur dioxide spray mist onto surface 3. Diluted bismuth white splatter spot spray

4. Ferric nitrate fine spray cover surface fine coating. 5. When dry wax

Words of caution to anyone thinking of learning how to patina bronze, exercise caution and a generous helping of common sense. The patinas we use are applied in a very well ventilated area and masks and gloves and protective aprons are a must. We also exercise considerable caution when heating up bronze as temperatures above 100° can burn exposed skin.

Liver of sulfur – yellow brown to black tones

Ferric nitrate – red tones

Ferric chloride – darker red tones 

Bismuth nitrate and titanium dioxide – white

Cupric chloride  – pea green or apple green

Cupric nitrate – blue green

A very good site for reading more about patinas and for practical advise on formulas can be found at David B. Bowman an artist in the San Francisco Bay Area.

A Guide to Welding Sculpture

The skill set developed in  creating bronze and steel door handles has proven an invaluable foundation for Martin Pierce’s art work. However, until we recently met Maria Ramirez-Adams we were unable to document the welding and patina techniques used in both hardware and art. Maria’s skill in capturing these moments will be the focus of this and other posts.
For those unfamiliar with the different types of welding www.thecrucible.org provides some very accessible well written pieces as well as instructional courses.
To assemble the components parts of a door handle we use the TIG welding method which does have a slow learning curve but is well suited to welding different thicknesses of metal and to welding very small pieces that need just enough weld to form a tight small bond. TIG welding can be used to weld either our 316 marine grade stainless steel or our silicon bronze castings. The abbreviation TIG stands for Tungsten inert gas also known as tungsten gas arc welding. TIG welding works by heating up the areas of metal to be connected and by inserting a welding rod of the same metal in this area to create a pool of melted metal that will form a connection or weld. The welding torch has a tungsten electrode that, on contact with metal, sparks to form an arc. While the electrode receives a constant current of power the voltage is controlled by a foot pedal which when depressed shortens and intensifies the heat of the electric arc.

Argon gas plays an interesting role, it’s purpose being to protect the welding process from contamination. The gas passes through the welding torch and shrouds the arc of the torch thereby preventing the weld area from being degraded by oxygen and other elements that could impact the integrity and strength of the weld. Argon gas is inert or inactive so it does not combine with elements in the air or work area so works perfectly as a shield.

To see Martin in action welding visit this informative video by Maria Ramirez-Adams.


The Hornet on Apple is a limited edition of 30 and is part of a collection of larger-than-life insects and diminished scale humans. The piece weighs 32lbs, measures 13"W x 10"D x 13"H and is a welding challenge. To attach the human to the apple the surface of the apple is heated first and then the welding torch is brought closer and closer to the human and apple and a small area of the foot and apple are melded or tacked together to form a temporary connection. The welding rod is then melted to fill in the remaining gap between the foot and apple.

In door hardware the non-operative door trim typically the requires fine TIG welding. For example, the operative Hedgerow passageway set has moving non-fixed parts and is assembled with through bolts and a spindle that activates the door latch. By comparison,  non-operative version is fixed in place and the lever is welded to the backplate using the fine TIG technique.


Left: Showing weld before clean-up Center: Buffed Right: Operative Form

A complimentary accessory to the dung beetle

After casting and patinating the first bronze dung beetle, we felt it was missing its ball or dung larder for the food needed by the eggs that are laid inside which will grow into hungry grubs.

Dung beetle from the collection of fantasy sculptures

The adult beetle locates dung by smell and he collects and works the dung to create a ball which is rolled to collect layer upon layer of dung. However, the location of the completed dung ball is not always ideal and the ball may need to be moved to a better pre-established nesting area.

In order to move the dung ball, the beetle rolls it backwards by holding it with its rear legs and pushing  with its front legs. Doing it this way has its setbacks, as it cannot see obstacles in its path or see if he is pushing in the right direction.

As the pathway cannot easily be seen he climbs on top of the dung ball and turns in a circle to get his bearings. To navigate the correct direction, he uses the  position of the sun during the day and position of the stars at night as a compass. These are remarkable insects and are not complete without their ball.

The dung ball we have created is a perforated organic bronze shell, we used our artistic license to create something a little more attractive than the typical dung ball.

The ball is approximately 7 inches in diameter and cast in 3 sections that welded together in the bronze.

The overall sculpture with dung beetle  is 12 inches high.


The beetle navigator’s head and thorax were patinaed a blue green and the wing casing was patinaed dark grey black.

 For more functional creatures please look at our animal cabinet pulls and our netsuke collection of dragon, bee and frog door knobs.

Mexico City - Magical Destination

Mexico City is like that rare book or film that exceeds all of your expectations. We have visited Paris, Barcelona, Copenhagen, London but none was as vibrant and colorful as the sights  and people we found in Mexico city.

We began our first day exploring parts of Condessa and Roma Norte before catching the metro to Jamaica market. This was the day we travelled with the aid of Panda, our highly informative and very funny local guide to enjoy street food in her “Eat like a local” day tour. I am not a fan of the metro having taken both the underground in London and metro in Los Angeles but found the cleanliness and safety of this Mexican metro a pleasant discovery. We arrived at Jamaica market, a must stop for sampling delicious green chorizo tacos and huitlacoche, a corn that has a fungus that imparts a unique flavor. For liquid refreshment we sampled tepache, a fermented drink made form pineapple, sweetened with agave with a hint of tamarind and cinnamon. Flowers of all types are  also a feature of this market  and arrive fresh each day to be pruned and prepped for customers.

On our second tour we drove with Gabriel of Karma Trails  south to Xochimilco  or floating gardens an area of canals and colorful boats or trajineras and also a flower growing area that supplies markets including Jamaica market. The canals link the small man-made islands that evolved over time to supplement the farming terraces in the surrounding hills.


Next, we visited Coyoacan which is south of Condessa and north of Xochimilco and where the first organized settlement was established. The hacienda and casa configurations became the template for many of the Spanish towns that took root as the Spanish moved north and south of the city. Cobbled streets connect the residences to the commercial center and the town square fittingly has 2 bronze coyotes, namesakes of the towns translated  name “Place of coyotes”.

 Frida Kahlo lived and worked in Coyoacan and much of her work is on display at the Frida Kahlo Museum inside the blue house that was her residence.

Much of the history of Mexico City is on permanent display in its architecture and gardens but to understand pre-colonial times visit the National Museum of Anthropology located in Bosque de Chapultepec a park on par with New York’s Central Park. The museum chronicles the history of the indigenous people from the Mayan era to Spanish Colonialism with wonderful displays depicting  their differing  social lives, religious beliefs, and commerce.

Xochipilli - Aztec God Of Art, Games and Flowers on Display at the National Museum of Anthropology

 The street art of Mexico City is every where and from our Sofitel Hotel room we had a daily viewing of “Generation Equality” by Adry del Rocio a Mexcian artist of world repute.

On this trip we took a break from searching out door handles but could not help but notice the creative and detailed iron work on display in the historic district so hopefully we can devote more time to these crafts in our next trip.


Beauty is in the eye of the beholder

When developing our line of Dog Knobs, one of the breeds we chose was the Staffordshire Bull Terrier, although not the most popular of breeds, we had one lovely example named Iris who we dearly loved. Iris has since past and now we have another Staffy called Jackson who is a very young, very strong and a very vocal young male. When we were contemplating a second Pit Bull, we spent time meeting rescue dogs to see if Iris would share her home with one and Jackson was her choice. Had we not spent the time checking both dogs for compatibility we may well have repeated a mistake made years before when we foolishly asked our resident Vizsla to share her home with a second Vizsla. While that particular canine bond was always a sensitive one, Jackson and iris got on fabulously and indeed Iris’s longevity and mental acuity we ascribe to Jackson’s puppy playfulness.

While Iris’s markings and ears  were very different to multi-colored perky eared Jackson, they both share the same head shape and extremely powerful jaw with soft and gentle muzzle and disposition.

 We understand that every dog owner loves their particular companion’s characteristics so for those of you with poodles, boxers, French bull dogs Golden retrievers, Labradors or German Shepherds, rest assured we have leash hooks and door knockers available for these breeds.

Oil Rubbed Bronze

We are revisiting ways we show our collection of Willow entry door knobs and interior handle sets. The trend is moving from old darker traditional finishes to lighter oil rubbed finishes.

The Willow collection, while inspired by swirling willow leaves and tendrils, still reflected the classical lines of older European architecture that Martin and I knew in England. Indeed, Martin’s training as a wood carver required him to carve more formal flowers and  leaves as relief carvings and this education served him well when carving the very detailed facets of the Willow collection.

 By moving away from dark oiled bronze to a lighter patina the detail of the piece is now able to shine through. We hope you will like this new direction but should you still be looking for a more Baroque or Victorian finish we are continuing to offer this collection in darker tones.

The photos here show  the before and after appearance of the passageway, privacy and entry knobs and lever sets.

To create the light and dark patinas we follow the same process of finely buffing away  imperfections visible on the surface of bronze and then immersing the piece into a premixed oxide. The oxide creates a fine dark film as it adheres to the surface but it is immersed twice to create an even and strong bond. The oxidized bronze is then re-buffed or sanded thereby removing the dark patina to expose the bright champagne tone of the silicon bronze.  The difference between these 2 finishes reflects how much and what areas of the oxidized film are removed by buffing.

The degree to which the surface is sanded and polished also impacts the level of contrast this is done prior to the casting being oxidized. In the darker piece the willow leaves were polished to a higher luster than the back plate which was left as a satin finish and which when oxidized creates a greater contrast. By comparison the lighter piece was more evenly polished to a satin finish and the effect is a more universal tone.

A simple and complicated mold for lost wax casting

  A simple and complicated mold for lost wax casting

 Martin’s art journey continues and the story line of the insect world of giant insects is evolving as he begins to depict the dung beetle’s family life.

In nature many dung beetles have been photographed  moving their prized dung balls with alacritous backward leg movement. The dung ball is prized as it can be used as a food source or as a site for the female dung beetle to lay her eggs in which is called a brood ball.

In Martin’s fictional world he has opted to create a more faceted airy dung ball and one with organic hollows that will eventually be populated with offspring or dung beetle artifacts.

The patterns has been created, 3 molds have been made and the first red wax replicas have been poured.

The dung ball pattern began with a turned round wooden ball. A hollow fiberglass shell was molded over the ball by applying successive layers of fiberglass cloth sandwiched together with resin. Once set, the fiberglass ball was cut and removed from the wooden ball leaving a hollow shell. An organic design was drawn onto the face of the shell, and using a Dremel, sections were cut out and removed. The fiberglass shell was coated with three layers of gesso which was sanded to soften the edges. The shell was sprayed with primer and work on the mold began.

While the mold was made using simple compounds the process was complicated and time consuming. Layers of liquid rubber were built up inside the perforated shell. To prevent the rubber from pouring through, the holes of the shell were filled in with pieces of modelling clay molded by hand to fit each irregular hole. The outside of the shell was then coated with coats of liquid rubber and once set the rubberized outer shell was hardened with successive applications of fiberglass cloth and resin. Prior to the mold being made the pattern was treated with a release agent to prevent the mold material from forming a permanent bond. The end result is a 2-part hollow mold that is now used to make red wax replicas of the original pattern.

Choosing New Hardware For an Old Door

Clients typically order our work because they appreciate it’s unusual and unique quality. Occasionally customers turn to us for help finding door hardware that will work with an existing door’s bore and screw holes. I recently received an inquiry from a customer who had repainted her entry door and now was searching for a  handle set that would compliment her entry and  either conceal or make use of the existing holes. What she discovered is that most hardware manufacturers have set dimensional choices with no leeway for customization.

Doors are generally made with preset drilled holes, typically one for the keyed cylinder and one for the lever or knob. The distance between these 2 bore holes is referred to as the “center to center”. When retrofitting a door with a new entry set these existing holes can be difficult to fill and conceal if the door is natural or stained wood. Some doors may have more holes to deal with as would be the case with the Hedgerow entry thumb latch set shown here which requires 4 holes to be drilled.

The Hedgerow set however has a large backplate and at 20” in height and 3” in width would cover most pre-existing door holes. Our backplates are machined after they are cast giving us the ability to customize the center to center to work with existing bore holes. The additional holes that this set requires for the mounting posts will be drilled into the door when our handle set is installed.

We also have the flexibility of changing the location of the mounting posts as we cast these separately and later weld them onto the back of the plate.

Mushroom a fruit of nature and imagination

When I think of fruit my mind conjures up images of persimmons, strawberries and other sweet delicacies that I am fond of but it does not bring to mind mushrooms. This January we discovered a rather humorous and very suggestive mushroom in our garden and I was intrigued to learn more. The internet journey was helpful and I learned  that the mushroom in our garden is known as the stinkhorn which explains why our food obsessed dog gave it only a passing sniff.

The mushrooms in our collection of cabinet pulls like so many of our pieces are not a literal portrayal of any specific mushroom rather they are  a synthesis of different mushroom types that we cook with and that we grew up with. The toadstool, portobello and shitake mushrooms shapes are the closest to the shape of our left and right mushroom pulls. So what is our small double capped button mushroom pull closest too?

I discovered that the button mushroom, cremini and portobello mushrooms are not different species but rather different stages of the same species, Agaricus bisporus. The button mushroom is the young immature form and is characteristically paler and milder in flavor. The cremini stage is somewhere in the middle with a more defined flavor and the portobello is the mature adult with a very full meaty flavor. As the mushroom develops its anatomical parts are more easily seen and are labelled here.

The mushroom is the visible fruit of  a much larger fungus and the gills of the cap contain the spores which allow the fungus to continue reproducing. The mycelium is the vast root system of the fungus and it can cover acres and is critical to most plant life. I have labelled the mushroom parts in my greyscale photo of our left facing mushroom.

Orchid Door Handle

Last year I had the pleasure of working with Kellie Beaubelle a designer in Orinda, CA who was  looking for unusual hardware, what followed was a highly imaginative collaboration of design talents.

The project began with a finite plan for one entry  handle set, but once installed, the scope was expanded to include all the exterior doors that were fabricated by the door maker with Anderson multi-point locks. To accommodate the multi-point mechanism, we created a new turn piece design that has been added to our Hedgerow and Willow multi-point sets and which we will be expanding  to our other multi-points collections.

The project did not end with the entry doors as once the creative genie was out of the bottle Kellie wanted to see what artistic pieces could be added to the master and guest bedrooms. In a previous post we have documented how the Venus slipper orchid was redesigned by Martin Pierce to create a grand scale door pull which for Kellie’s project has been used for 3 large vanity drawers.

Once the concept was approved, we worked with Kellie’s vanity plan to create a mock-up idea showing how the orchid would look on the cabinet drawers. The pattern development and mold creation have been documented in 2 previous posts but now we can share photos of the piece cast in bronze and also nickel plated in a satin finish.

Plan drawing courtesy Kellie Beaubelle

Orchid handles added by Martin Pierce

The Venus slipper orchid has a pronounced stamen and labellum that project out from the body of the flower and in the casting, it is these points that are gripped to pull open the door or drawer.

CREATIVE NEW YEAR 2023

Our New Year’s goal is to continue to be creative and to share our ideas for original door handles and cabinet pulls with the design and home owner communities. We wish you all a Happy Healthy and Creative 2023 and look forward to helping you create inspiring settings.

These succulents, commonly known as red hot pokers brighten up our sidewalk where we planted them 7 years ago and where they thrive with minimal water. I am always amazed when they bloom as it is difficult to fathom how such intense color and beauty require such little sustenance.

Our bamboo cabinet pulls are also inspired by plants that thrive with little water.

Have a Merry Christmas from all here at Martin Pierce.

The orchid spray in the banner is a unique design that will be covered in detail next year along with a new orchid piece. If you are looking for orchid knob inspiration we have an orchid knob and orchid pull in our collection of plant theme cabinet hardware.

Custom Multi-Point Hardware

We are pleased to announce that we have created two new pieces that will make our existing Willow and Hedgerow multi-point trim suitable for installation with Andersen’s current multi-point lock.

Hedgerow Multi-Point trim interior view showing new turn piece designed to work with an Andersen multi-point lock

 Overview of multi-point lock

The multi-point lock and the mortise lock provide good alternatives for making an entry or patio door secure and which you chose will depend on several factors the most critical being that the multi-point lock usually needs to be installed when the door is being made. The multi-point lock is also designed to be activated by a lever rather than knob or thumb-latch and this is a critical factor in choosing suitable hardware trim.

The multi-point  has 3 locking points when the door is a single door and 5 when there are double doors.

The  multi-point system has 2 main components. A rod extension mechanism that has an  upper and lower section that is installed inside the door during manufacture and a deadbolt unit that the extenders are attached to.

The extenders are activated by a decorative lever that  is installed into the central deadbolt unit. When the lever is pushed upwards the extenders act as locking bolts and are thrown upwards and downwards into header and threshold securing the door at these 2 points. A decorative knob or turn piece is installed in the deadbolt box and when turned throws the tongue of the deadbolt into the door jam or in case of a double door into the non-active door.

Decorative Levers Escutcheons and Turn Pieces

Given that the multi-point mechanism is pre-installed during door manufacturer many consumers assume that this means they must also order the trim from the multi-point lock manufacturer, a fact that is far from the truth.

Willow and Hedgerow adapting for multi-point

Our standard turn piece that is used with Accurate’s mortise lock is cast with a fixed spindle that is on the diamond. Our standard turn piece for a deadbolt is cast on the square with a slot. Neither turn piece was suited to the Andersen deadbolt so we created 2 new turn pieces both square and with a square hole designed for Andersen’s activator. The photo shows how our new Hedgerow turn piece aligns with the activator. As we design and make all our work locally in Los Angeles we are well positioned to adapt our designs to suit different multi-points manufacturer by third parties.


Thanksgiving 2022

Wishing all of you a Happy Thanksgiving.

To create a seasonal collage, we decided to use the Willow flush door pull and the Willow sprig cabinet pull.

The Willow recessed handle is typically used as a barn door pull and is visible on the side of the door which would be routed out to accommodate it’s 3/4'” depth.

You will have to look closely to find out how we incorporated this piece in the banner collage to create a diamond shaped accent.

Since the pull displays only half of a flower head, we created a copy in Photoshop which we then rotated to make a whole flower head.

The Willow sprig required less assistance and was easily colored a bright green.

Patina Artistry

In the course of the working week as I pass through the small studio here at Martin Pierce, I am often captivated by the workmanship of our patina artists. The assembly of like pieces that I see are images I wanted to capture as they are both very beautiful and can be captured in our small photo light box.

We started photographing our work as a way of keeping a diary of the different projects and new developments and with the help of a professional photographer learned some of the basic techniques of how best to shoot our work. Our photographs are taken with a Canon EOS Rebel T3 with a zoom lens inside a 5-sided white light box using  rows of small LED lights for an evenly dispersed downward light beam. The light box is housed inside a small dark room with almost no natural light. For stability the camera is placed on a small tripod. The camera is not state of the art and an equally good photograph could be created using a mobile device but what is critical is the light box and even distribution of light.

The willow friends shown above are being prepared for a new home in northern California and they are part of the handles we are making for 11 pairs of double doors that will be locked with an Anderson multi-point system. The Hedgerow and Willow collections were specified for the doors and the cabinet pull selections have been from the orchid and beetle and willow collections. In subsequent posts I will detail how we created 2 custom turn pieces to work with the Anderson lock.

Happy Halloween with tigers, bugs and bats

Whether for Halloween, or for no other reason that simple fun, enjoy our creations any time of the year. We have a collection of animal and insect cabinet pulls to chose from all cast in bronze and made to order here in Los Angeles.


For those looking for animal inspired door handles we have a collection of lizard, dragon, frog and rabbit door knobs to chose from. Each piece is first rendered in wax before being dipped in silica to create a tough exterior ceramic shell and finally cast in molten bronze. The process is not complete until each piece is “chased” or finely tooled by hand to remove any imperfections. Still not complete, the piece must be burnished so that it can be finished with either a simple oil rubbed patina or a more colorful hot patina. Voila! A unique piece is ready for your home or office door or cabinet.


The tiger door handle is now available as a powder coated piece in a wide variety of colors. If you have a brand color this can be matched by creating a custom powder. As mentioned in a previous piece, we are moving away from illuminated handles and offering all these pieces in  powder coated colors. The dramatic effect is not diminished but this provides a low- tech solution to supply chain problems with small LED lights.